
At their core, the two effects are worlds apart. Reverb is the dense wash of sound you hear in a large hall, while echo is the distinct, repeating reflection you’d hear shouting into a canyon. Reverb’s job is to create a sense of space and atmosphere, whereas echo is all about separation and rhythm.
People throw these terms around all the time, sometimes interchangeably, but they’re completely different acoustic phenomena. Getting a handle on their real-world roots is the first step to using them like a pro in your mixes.
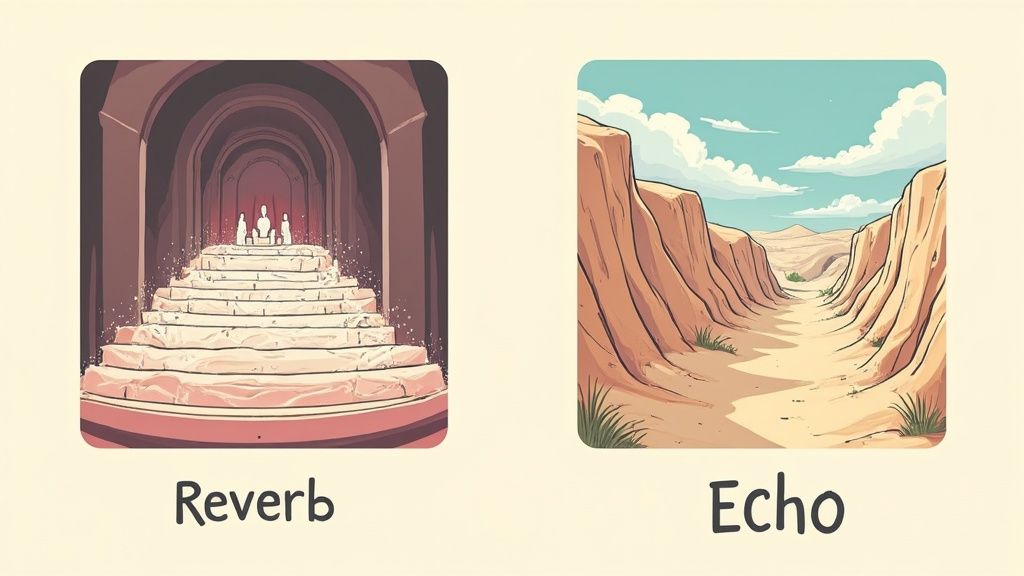
Echo is the easy one. It’s a single, clear, delayed copy of a sound. Think of yelling your name across a valley and hearing "…name… name… name…" call back a few moments later. This happens when a sound wave hits a distant surface and travels all the way back to your ears with enough delay that your brain hears it as a totally separate event.
Reverb, on the other hand, is a beautiful mess. It’s made of thousands of reflections hitting your ear so fast that they all blur together into one continuous, decaying sound. It’s the sound of clapping your hands in a massive cathedral—you don’t hear individual claps, just a rich, lingering tail that tells you exactly how big that room is.
To really nail this down, the table below breaks down the essential distinctions. It’s a handy cheat sheet for those moments when you need a quick gut check on which effect to reach for.
Ultimately, the fundamental difference between reverb and echo is how our brain processes the timing and density of sound reflections. Echo gives you clean repeats; reverb gives you a complex sense of environment.
At a technical level, the key distinction is time. An echo is a clear, delayed repetition of a sound, typically requiring a delay of at least 50 milliseconds to be perceived separately. In contrast, reverb is a dense cascade of reflections arriving in quick succession, creating a continuous sonic texture. Learn more about the physics of these effects.
Once you internalize this core difference, you start hearing these effects everywhere and can begin to use them with intention instead of just guessing.
To really get a handle on the reverb vs. echo debate, you have to think about how sound actually moves through a physical space. It all boils down to the journey sound waves take and how fast their reflections get back to your ears. A room's character—its size, its shape, the stuff on the walls—is what determines if we hear a dense wash of reverb or a distinct, repeating echo.
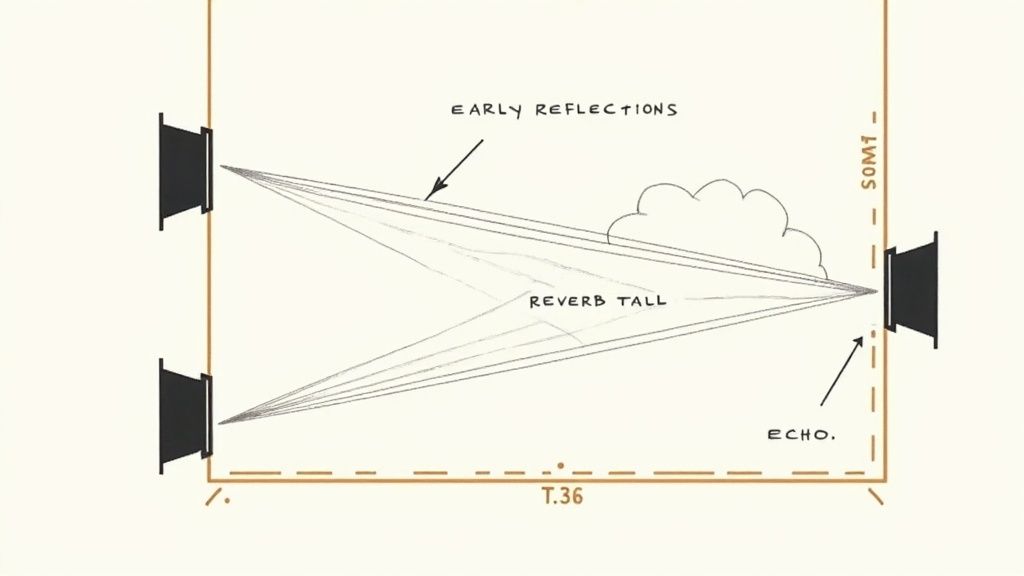
Picture someone making a sound in a room. The very first thing you hear is the direct sound. A split second later, a flurry of early reflections arrive. These are the first few sound waves that have bounced off the closest surfaces, like the walls, floor, and ceiling. Their timing and loudness give your brain a ton of information about how big the space is and where you're standing in it.
Right after those initial bounces, you get a dense, chaotic web of thousands more reflections hitting your ears from every direction. This complex mesh of sound is what we call the reverb tail. It’s that lingering sound you hear as it slowly loses energy and fades out.
To control these effects in your DAW, you've got to understand a few core parameters. These are the settings that let you manipulate the physics we just talked about.
Think of it this way: an echo is basically a single reflection with a really long pre-delay and no messy tail. A reverb is what you get when thousands of reflections arrive so fast that you can't tell them apart, creating one continuous, evolving sound.
The main difference you'll see in your DAW is that an echo is defined by its delay time—the specific gap between each repeat (like 250ms). Reverb, on the other hand, is defined by its decay time and the overall character of all those blended reflections.
This difference in control is everything when it comes to using them correctly. Getting a grip on these parameters is just as critical as knowing how to place sounds in the stereo field, a topic we cover in our guide to panning in music. When you shape these settings, you're literally building a virtual room around your sound.
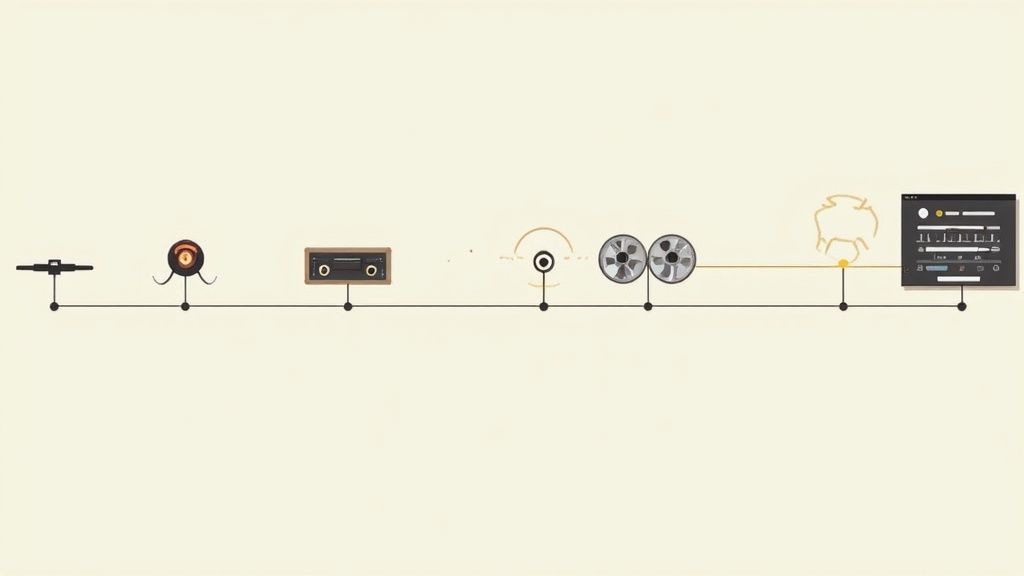
The drive to bottle up and control ambiance is almost as old as recording itself. In the early days, producers would go to absurd lengths, building entire echo chambers—rooms with super-reflective surfaces—just to pipe audio through and re-record the result. It was a painstaking process, but it laid the foundation for everything we use now.
Things really started moving when engineers figured out how to create these effects in more compact, mechanical ways. By the 1940s and 50s, artificial reverb went mainstream with the invention of plate and spring reverbs. Then, in the 60s, echo got its own breakthrough with tape delay machines like the iconic Echoplex, which finally gave producers repeatable control over delays. But the digital revolution of the 1980s changed the game entirely, making it possible to perfectly mimic these effects with unmatched consistency.
Before plugins took over, the distinct character of analog gear defined entire genres. Every piece of hardware had its own sonic fingerprint, full of quirks and imperfections that producers absolutely fell in love with.
The old hardware was never perfect, but its flaws became its biggest strengths. The faint noise, saturation, and modulation of a tape echo or the bright sheen of a plate reverb are textures that modern plugins still work incredibly hard to emulate.
Fast forward to today, and digital plugins give us a level of control and variety that was once unimaginable. Algorithmic reverbs can whip up anything from a tight, small room to a massive, otherworldly space with pristine clarity. Digital delays deliver crystal-clear repeats, locked perfectly in time with your project's tempo.
This kind of precision is a must for modern production, where clarity is king. Of course, getting that professional sound involves more than just reverb and delay—you also have to master the stereo field. We get into the weeds on that in our guide to the best stereo imaging plugins.
Understanding this journey from physical rooms to analog boxes to lines of code gives you the context you need to grab the right tool for any creative job.
Okay, knowing the theory is one thing, but making reverb and echo actually work in a mix is a totally different ballgame. The first, most critical technique isn't about a specific plugin—it's about how you route your effects in your DAW.
Sure, you can just slap a reverb plugin directly on a track (that’s called an insert). But the pro move, especially for time-based effects like these, is to use what’s known as a send (or bus/aux track).
This send/return setup is a complete game-changer. Instead of loading up a unique reverb on your vocal, another on your guitar, and another on your snare—which absolutely torches your CPU—you create one dedicated reverb track. Then, you can "send" a little bit of signal from all those different instruments to that one reverb. The result? They all sound like they're glued together in the same virtual room.
Using a send lets you process the "wet" (effected) signal completely separately from the "dry" (original) one. This gives you independent fader and EQ control over the reverb itself—the real secret to getting a clean, spacious mix that doesn't just turn into a soupy mess.
Getting your sends configured is super simple, and it unlocks a ton of creative power. This approach works perfectly for both reverb and echo, and honestly, it’s fundamental to keeping your sessions organized.
This method keeps your original tracks punchy and upfront while letting you blend in the perfect amount of atmospheric space or rhythmic delay around them. It’s an essential part of learning how to mix vocals and other core elements.
Here's a quick reference table with some go-to starting points for dialing in reverb and delay on common instruments. These are just guidelines—your ears should always have the final say!
Tweak these settings to fit the tempo and vibe of your track. Remember, a little goes a long way.
Once your sends are ready, it's time to dial in the settings. Every track is different, but here are a couple of classic starting points that just plain work.
A go-to technique for vocals is using a short plate reverb to add some body and depth without making it sound distant. I usually start with a decay time around 1.2 seconds and then play with the pre-delay, setting it somewhere between 20-40 milliseconds. That tiny pre-delay creates a pocket of air between the dry vocal and the reverb wash, which makes a huge difference in clarity.
For electric guitars, you can't go wrong with a classic slapback echo. Just grab a simple delay plugin, set the feedback to 0% so you only get one repeat, and find a delay time between 80-140ms. A great pro tip is to EQ the delay itself—roll off some of the highs and lows so it doesn't fight with the main guitar tone. It adds instant vibe and rhythmic energy without cluttering things up.
Of course, getting these effects to sit right depends on the whole mix being locked in. That's why using a BPM and Key Finder for flawless mixes is so crucial; when everything is in time and in key, your reverbs and delays will feel much more natural and musical.
https://www.youtube.com/embed/SCUUu96PYjo
Knowing the textbook difference between reverb and echo is a good first step, but the real magic happens when you know which one to grab to serve the song. This choice isn't just technical; it fundamentally shapes how a listener feels your music in their gut. It’s less about a “right” or “wrong” answer and more about pure creative intent.
Are you trying to make a bunch of separately recorded instruments sound like they're all playing together in the same room? That's a job for reverb. It's the master of creating a sense of scale and depth, convincing your ears a vocal was tracked in a grand hall or a snare is popping in a tight, punchy room.
On the other hand, if you need to inject some rhythmic energy, a vintage vibe, or a hypnotic, repeating pattern, you'll want to reach for an echo. Its distinct, separate repeats can lock right into a track's groove, building a sense of movement that reverb’s dense wash just can’t replicate.
The decision usually boils down to one simple question: do you need to create a sense of space or a sense of rhythm?
Honestly, answering that question will point you in the right direction 90% of the time. Reverb is for filling gaps and building atmosphere. Echo is for creating patterns and adding a percussive feel.
This decision tree lays it out plain and simple.
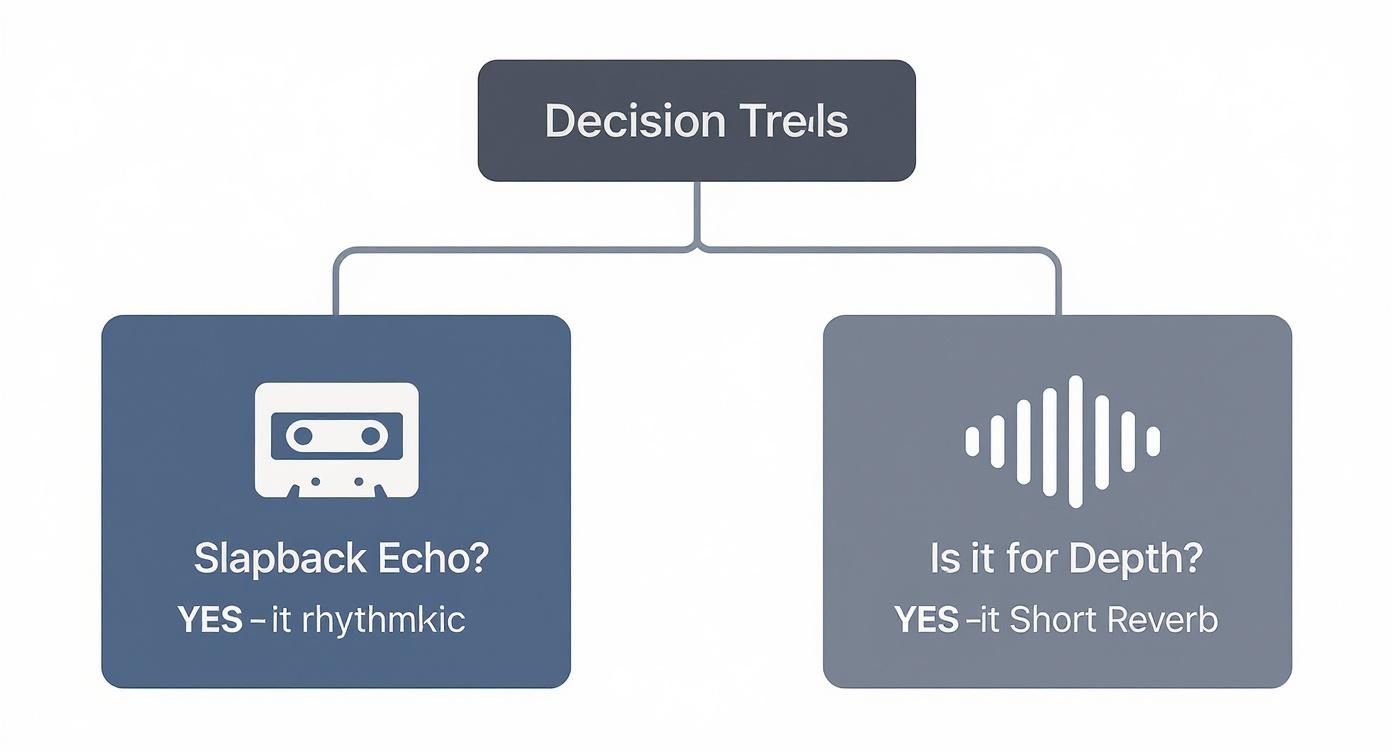
As you can see, if you need a rhythmic feel, the path leads to echo. If you need depth and ambiance, reverb is the answer.
This isn’t just some academic detail; it makes a huge difference in how professional a mix sounds. In fact, industry surveys show that around 85% of audio engineers are extremely deliberate about choosing between reverb and echo to keep their mixes clean and impactful. You can dig deeper into how the pros think about echo vs reverb on secondskinaudio.com.
Decision-Making Quick Guide
- For Depth and Realism: Go with reverb. A short room or chamber reverb can put an instrument into a believable space without making it sound distant.
- For Rhythmic Energy: Use echo. A quick slapback delay or a tempo-synced quarter-note echo adds immediate movement to guitars, synths, or vocals.
- For a Vintage Vibe: Echo is your best friend. The warble of a tape echo is the signature sound of classic rock, dub, and rockabilly.
- For Epic, Lush Vocals: It’s gotta be reverb. A long plate or hall reverb delivers that massive, professional vocal sound you hear on countless hit records.
Of course, the rules are made to be broken. Some of the most interesting sounds come from using both effects together.
A classic move is to send a vocal to two different aux tracks: one with a short slapback delay and another with a medium plate reverb. The echo gives you that initial rhythmic character and definition, while the reverb swoops in right after to place the whole thing in a larger, cohesive space.
This layered approach gives you the best of both worlds. You get the rhythmic punch of an echo and the spatial depth of a reverb. Try experimenting with EQ on each effect send—maybe roll off the highs on the echo to make it dark and boost the highs on the reverb to make it shimmer. This is how you start creating complex, evolving textures that give your mix a signature sound.
Getting reverb and echo right is one of those things that really separates an amateur mix from a professional one. It’s a common stumbling block for a lot of producers, and it’s easy to fall into the same traps that leave your tracks sounding muddy, cluttered, or just plain weird. Learning to spot these pitfalls is the first step to getting that clean, polished sound you're after.
One of the most frequent mistakes? Going overboard on the reverb. It’s so tempting to drench a vocal in a massive hall preset, but that usually just shoves it to the back of the mix, killing all its clarity and intimacy. The whole point is to enhance the sound, not drown it.
Another classic issue is using spatial effects that fight the song's rhythm. An echo that isn’t synced to the track’s tempo can make things feel chaotic and distracting. In the same way, a reverb with a decay time that’s way too long will bleed all over your musical phrases, smearing transients and blurring the transitions between sections.
If your mix just doesn't feel right, there's a good chance your spatial processing is the culprit. Here are a couple of practical fixes for problems you'll definitely run into.
The secret is making your effects serve the song, not the other way around. Often, the best spatial effects are the ones you feel more than you actually hear. They're there to add depth and vibe, not steal the spotlight.
Beyond just twisting knobs, producers often find that effective workload management in post-production is just as critical for maintaining quality. Sometimes, stepping away and coming back with a fresh perspective is the only way to realize an effect is doing more harm than good.
Even when you feel like you've got a handle on the basics, a few specific questions always seem to pop up in the middle of a session. Let's tackle some of the most common hurdles you'll face when deciding between reverb and echo.
Absolutely. In fact, you probably should. This is a classic move for creating complex, professional-sounding depth that you just can't get from one effect alone.
A perfect example is on a lead vocal. You might use a quick slapback echo to give it some rhythmic punch and definition, then feed that same vocal into a separate plate reverb to glue it into a larger, more cohesive space. The secret is always to use them on separate send tracks—it gives you total control over each element.
This is a trick question. Neither is inherently "better," because they're doing two completely different jobs. If you're chasing that classic, polished vocal sound that just sits perfectly in a mix, a good plate or hall reverb is almost always the starting point. It's what gives the vocal its sense of dimension and space.
But sometimes, a subtle, tempo-synced echo can bring a modern rhythmic vibe or a vintage feel that reverb simply can't touch.
A common pro workflow is to use reverb to create the main sense of space, then tuck a quiet, filtered echo underneath it. The echo adds a rhythmic texture that you feel more than you actually hear.
If your reverb is turning your mix into a swamp, the culprit is almost always a buildup of low-frequency mud. All those long, booming reflections are clashing with your kick and bass, eating up headroom and killing your clarity.
The fix is surprisingly simple: just put an EQ on your reverb send track. Slap on a high-pass filter and start cutting everything below 300-500Hz. This carves out all that boomy mud, instantly cleaning up the low-end of your mix. It's one of those five-second tricks that makes a massive difference.
For 99% of musical situations, yes. When you sync your delay time to the track's tempo (think quarter notes, eighth notes, dotted eighths), the echo becomes part of the song's groove. It feels intentional, musical, and locked-in with the arrangement.
Unsynced delays have their place, of course—mostly for creating chaotic, trippy, special-effect textures. But if you try that in a standard mix, you'll usually just end up with a cluttered, distracting mess that fights the rhythm of the track.
Ready to make sure your carefully crafted mixes actually sound good in the car? CarMaster is the only AI mastering service built from the ground up to optimize your music for car speakers. It prevents the nasty phase issues and boomy bass that can wreck an otherwise great track on the road. Hear the difference for yourself with a free, instant preview at https://www.carmaster.io.

.png)