
Mixing vocals isn't just one big step. It’s a series of smaller, crucial moves that build on each other. We’re talking about cleaning up the raw takes, shaping the tone with EQ, evening out the performance with compression, and then adding that professional sense of space with reverb and delay. Get these right, and you’ll turn a dry, lifeless recording into something that truly shines in the mix.
Before you even think about reaching for a compressor or a fancy EQ plugin, let's talk about prep work. This is the unglamorous but absolutely critical part of the process. It's the difference between a vocal that sounds clear and punchy and one that’s just a muddy mess.
Skipping these foundational steps is like building a house on shaky ground. Sooner or later, everything you build on top of it will come crashing down. Think of your raw vocal recording as a block of marble. Your first job is to meticulously chip away all the little imperfections to reveal the sculpture hidden inside.
Listen, almost no professional vocal you’ve ever heard was a single perfect take. It just doesn't happen. What you're hearing is a "composite" track—or a "comp"—pieced together from the best bits of multiple takes. The whole idea is to stitch together the most powerful, in-tune, and emotionally resonant phrases to create one seamless, superhuman performance.
When you're sifting through your takes, you need to listen for a few things:
It takes some focused listening, but this is probably the single most effective thing you can do to elevate a vocal. Once you’ve picked your favorite parts, you can consolidate them all into one clean audio file.
Okay, you've got your perfect take assembled. Now it’s time for a little sonic housekeeping. This means going through the audio file with a fine-toothed comb and getting rid of any little noises that will get painfully loud once you start compressing everything.
You’re hunting for:
This meticulous editing ensures you’re only enhancing the actual vocal performance, not all the noise around it. Getting your source audio right is also fundamental when it comes to things like adding professional voiceovers to video, where clarity is everything.
Pro Tip: Don't just chop out the breaths. A silent gap sounds unnatural. Instead, isolate the breath sound in your DAW and just lower its volume by 6-12 dB. It keeps the performance feeling real without being distracting.
To make this crucial prep stage a bit easier to manage, here's a quick checklist you can run through before you start reaching for your creative plugins.
This table breaks down the essential prep work. Nail these steps, and the rest of the mixing process will be infinitely smoother.
Once you’ve checked all these boxes, you have a clean, solid, and consistent vocal track that's ready for the fun stuff.
So, what’s gain staging? It’s simply the process of making sure your audio level is solid at every single point in the signal chain—from the raw audio file to every plugin you add. The goal is to send a healthy signal into each processor without it being so loud that it clips and distorts.
A good rule of thumb is to have your raw vocal track's peaks hitting around -10 dBFS on your channel meter. That gives you plenty of headroom to work with as you start adding EQ and compression.
Digital tools have made getting this right easier than ever. It's no surprise that the global vocal processors market was valued at USD 2.63 billion in 2023 and is only expected to grow. The demand for high-quality audio tools for studios of all sizes is massive.

This is where the magic really starts. Equalization, or EQ, is how you sculpt the actual character of the vocal. It’s less about volume and more about carving out a dedicated space in the mix where your vocal can sit perfectly without fighting the guitars, synths, or anything else.
Think of yourself as a sculptor. You don't start by adding clay; you start by chipping away everything that doesn't belong.
That’s why most of us start with subtractive EQ—cutting frequencies instead of boosting them. When you surgically remove the junk, you often find that the clarity you were looking for was buried underneath it all along. Get this right, and you'll need way fewer boosts later.
Your first job is to play surgeon and remove all the nasty frequencies that create mud, boxiness, or harshness. We're not gutting the vocal, just making precise, narrow cuts to solve specific problems.
A high-pass filter (HPF) is almost always the first move. This tool just rolls off all the useless low-end rumble that your mic picked up—think mic stand vibrations, air conditioner hum, or even some plosives. For most vocals, setting an HPF somewhere between 80 Hz and 120 Hz does the trick without making the voice sound thin.
Next, it's time to hunt for those "boxy" or "muddy" tones. You'll usually find these lurking in the low-mids, typically around the 300-600 Hz range. Here's a classic trick to find them:
This technique is a lifesaver. For a deeper dive into these kinds of surgical EQ moves, check out our guide on how to EQ vocals.
Okay, now that we've taken out the trash, it's time to enhance what's great about the performance. Additive EQ is all about gentle, broad boosts that bring out clarity, presence, and that professional "air" you hear on your favorite records.
The key word here is gentle. Tiny boosts of just 1-3 dB can make a world of difference. Don't go crazy.
Key Insight: Always, always, always EQ your vocals with the rest of the track playing. A vocal that sounds amazing in solo might get completely buried or sound painfully harsh once the drums and bass kick in. Every EQ decision has to serve the song as a whole.
The tools for this job are better and more affordable than ever. The music production software market was valued at USD 485.1 million in 2023 and is expected to more than double to USD 999.1 million by 2032. This explosion means indie producers have access to incredible plugins that were once out of reach.
Every voice is different, but certain frequency ranges tend to hold some magic. Think of these as starting points for your additive EQ boosts.
By balancing these subtractive cuts and additive boosts, you’re doing more than just fixing a recording. You’re making intentional, musical choices that help the vocal performance truly connect with the listener.
Once you’ve carved out the perfect vocal tone with EQ, it’s time to tackle dynamics. A great vocal performance is alive with energy—it has breathy, intimate whispers and powerful, soaring belts. That's fantastic for a live show, but in a crowded mix, those quiet parts can get completely buried while the loud sections jump out and feel jarring.
This is where a compressor becomes your best friend.
Think of it as an incredibly fast and precise automatic volume knob. It tightens up the dynamic range—the gap between the quietest and loudest parts—to create a more consistent and controlled sound. When you get it right, the vocal sits perfectly in the mix, ensuring every single word is heard without steamrolling the other instruments.
This infographic gives you a simple look at a compressor's two key controls, the threshold and ratio, which work hand-in-hand to tame audio peaks.
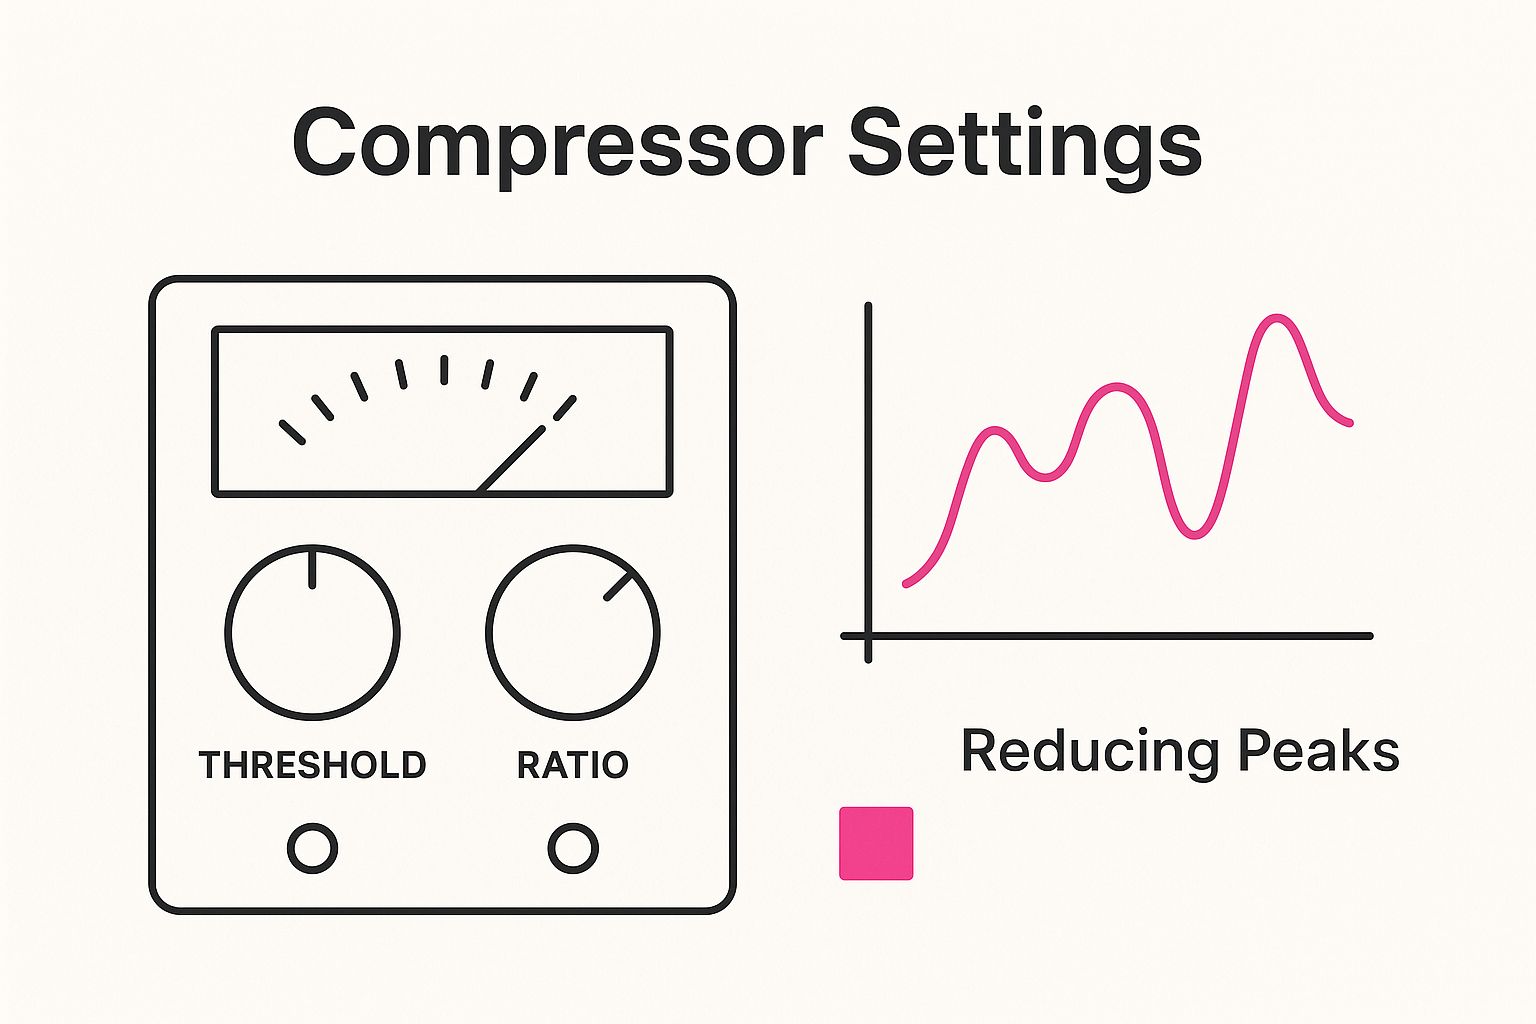
As you can see, once the audio signal gets louder than the threshold you set, the ratio tells the compressor how much to turn it down. The result? A much smoother, more predictable performance.
To really master compression, you have to get comfortable with its four main controls. Imagine them as a tiny team of engineers, making thousands of micro-adjustments every second to keep your vocal locked in place.
If you really want to cement these concepts, our guide on what compression does in music is a fantastic deep dive that breaks it all down.
Before you start applying compression to the whole vocal, it’s a smart move to deal with sibilance. I’m talking about those sharp, piercing sounds from “S,” “Sh,” and “T” consonants. If you ignore them, compression and any boosts from your EQ will only make them worse, turning a small annoyance into something that’s genuinely painful to listen to.
A de-esser is your tool for the job. It’s basically a specialized compressor that only targets a very specific high-frequency range where sibilance lives (usually somewhere between 5-10 kHz). By placing a de-esser early in your vocal chain, you can get that harshness under control before it gets amplified by everything else.
Just be gentle. Too much de-essing can make the singer sound like they have a lisp.
Instead of slamming a vocal with one compressor and forcing it to do all the work, many of us prefer a technique called serial compression. It’s where you use two (or even more) compressors back-to-back, with each one doing just a little bit of the work. The result is almost always more natural and transparent than what you’d get from one over-worked compressor.
Here’s a popular and effective approach for vocals:
Pro Tip: Don't just stare at the gain reduction meter—use your ears! Compression should make the vocal feel right, not just look right. If the performance starts to sound lifeless, choked, or dull, you've probably pushed it too far. Ease up on the threshold or lower the ratio until that energy and life come back.
To give you a head start, here are some practical starting points for different vocal styles. Think of these as a baseline—you'll always need to fine-tune the settings to fit the specific song and performance you're working on.
| Vocal Style | Ratio | Attack Time | Release Time | Goal |
| :--- | :--- | :--- | :--- |
| Pop/R&B | 4:1 | Fast (5-15 ms) | Medium (50-100 ms) | Upfront, consistent, and polished sound. |
| Rock | 6:1 | Medium (15-30 ms) | Fast (20-50 ms) | Aggressive, energetic, and powerful delivery. |
| Acoustic/Folk | 3:1 | Slow (30-50 ms) | Slow (100-200 ms) | Transparent control that preserves natural dynamics. |
| Rap/Hip-Hop | 4:1 | Fast (1-10 ms) | Fast (10-40 ms) | Punchy, in-your-face delivery that cuts through the beat. |
Once you get the hang of these techniques, compression stops being this mysterious, intimidating process. It becomes your number one tool for crafting a professional, polished vocal that always sits exactly where it needs to be in the mix.

After all that careful EQ and compression work, your vocal should sound clean, clear, and consistent. The only problem? It probably sounds a little too clean. Almost sterile. It’s like it’s floating in a void, totally disconnected from the instruments around it.
This is where the real fun begins. Now you get to play architect, building a three-dimensional world for your vocal to live in using reverb and delay.
These time-based effects are what give a track a sense of place. They create the illusion of a physical environment—maybe a small, intimate room, a massive concert hall, or something completely otherworldly. Without them, a mix just feels flat and two-dimensional.
Not all reverbs are created equal. The type of space you choose will have a huge impact on the final vibe, so your goal is to find one that actually complements the emotion and tempo of the song.
Here are a few classic flavors and when to reach for them:
The vast majority of producers are using plugins for this. The audio software plugin market is projected to be worth USD 1.37 billion in 2024, which just shows how essential these tools have become for modern music production.
Just slapping a reverb directly on your vocal channel is a rookie mistake and a fast track to a muddy mix. The real secret to professional-sounding ambience is processing your effects on a separate auxiliary (or bus) track. This gives you way more control.
Here’s how it’s done: send a copy of your dry vocal to a new aux track, then put your reverb plugin on that channel. Now you can blend the "wet" reverb signal back in with the dry vocal to get the perfect balance. But more importantly, you can now EQ the reverb itself.
Key Takeaway: Always EQ your reverb. Drop an equalizer after your reverb plugin and use a high-pass filter to carve out everything below 200-300 Hz. This one move cleans up all the low-end mud and rumble, keeping your reverb from fighting with the kick and bass. Your whole mix will thank you.
Another killer trick is using pre-delay. It’s a setting on your reverb plugin that creates a tiny gap—usually between 20-60 milliseconds—between the dry vocal hitting and the reverb kicking in. That tiny delay lets the initial punch of the vocal cut through clearly before the ambiance swells in behind it, which is crucial for keeping the vocal upfront and intelligible.
While reverb builds the space, delay creates rhythm and texture. It's an incredibly versatile tool that can do anything from subtly thickening a vocal to creating rhythmic echoes that become their own hook in the song.
As you work with delays and reverbs, always be thinking about the stereo field. Creating a wide, immersive space is what makes a mix feel huge and professional. Our guide on panning in music production dives deep into how you can position elements across the stereo spectrum to achieve that depth and width.
So far, we've dialed in our EQ, compressor, and effects with static settings. That’s a solid foundation, but a "set it and forget it" approach is the fastest way to a flat, robotic-sounding mix.
A real human performance breathes. It has moments of tension and release, intimacy and power. Your mix needs to follow that emotional journey.
This is where automation comes in. It's the secret sauce that turns a technically correct mix into something that genuinely connects with a listener. You're essentially drawing in the dynamic changes you want to hear, moment by moment. It's that final layer of polish that makes a vocal feel truly alive.
A lot of producers stop at automating the volume fader just to even things out. That’s just scratching the surface. The real magic happens when you start automating everything else.
Riding the volume fader is crucial, don't get me wrong, but it’s only the first step. The real power move is making small, dynamic changes to your effects throughout the song to amplify the emotional arc of the performance.
This is how you create contrast and excitement. A verse can feel close and personal with minimal effects, then the chorus can just explode with energy and space. The vocal should always be the star of the show, guiding the listener's ear from start to finish.
These aren't just technical tweaks; they are performance choices. You're becoming a co-performer with the vocalist, using the tools in your DAW to highlight their intended emotion. This is a huge part of what it means to mix vocals like a pro.
Let’s get practical. How can you automate your effects sends to create those powerful transitions? This is how you make a mix breathe and evolve.
Imagine your vocal in the verse is mostly dry, giving it an intimate, right-in-your-ear feeling. But as the pre-chorus builds tension, you want the chorus to feel huge. You can pull this off just by automating the send level to your reverb.
This one simple move makes the chorus hit like a massive release of energy. Then, when the next verse comes back around, you can automate the send to drop right back down, pulling the listener back into that intimate space instantly.
Pro Tip: Don't stop at reverb. Try automating the send to a rhythmic quarter-note delay on the last word of a chorus. This creates a classic "delay throw" that fills the space perfectly before the next section kicks in. It's a simple trick that adds a ton of professional polish.
Sometimes a vocal just needs a little extra grit to cut through a dense part of the track, like that final, all-out chorus. But if you add saturation to the entire vocal track, the softer parts can end up sounding harsh and over-processed.
Automation to the rescue.
Slap a saturation or distortion plugin on your vocal channel (or an aux send) and keep it turned down or bypassed for most of the song. Then, when you get to that high-energy section, you automate the plugin's mix knob or drive to kick in.
For example, you could:
This injects harmonics and a bit of an edge right when you need it most. It helps the vocal stay front-and-center without you even having to touch the volume fader.
After your effects are automated, it’s time for one last pass, this time focusing back on the main volume fader. Listen through the whole track from start to finish. Don't think about big moves; focus on the tiny details.
Is there one word that gets a little buried in the mix? Automate the volume up by 1-2 dB just for that single word. Does the tail end of a phrase poke out a little too much? Gently tuck it down.
This micro-automation is the meticulous final step that separates a good mix from a truly great one. It’s about making sure every single syllable is perfectly placed and emotionally resonant.
Even when you think you've got a solid process down, questions always pop up. Honestly, learning how to mix vocals is just solving one little puzzle after another. Here are some straight answers to the things that trip up producers all the time, especially if you're working out of a home studio.
Look, there’s no single "correct" order, but there is a smart order. A rock-solid vocal chain always starts with corrective stuff, then moves to dynamic control, and finishes with the creative effects.
If you stick to a logical sequence, you stop problems before they start. You really don't want to compress a bunch of nasty frequencies or, even worse, make piercing sibilance louder.
A great starting point that just works:
This is crucial: time-based effects like reverb and delay almost never go directly on the vocal track itself. Put them on separate bus tracks (auxiliary tracks). This gives you way more control and lets you EQ the reverb separately, which is key for a clean mix.
This workflow is all about fixing problems first, then controlling the performance, and then making it sound amazing.
Ah, the classic mixing challenge. The answer is almost never the volume fader. Just turning the vocal up makes it sound pasted on top of the track and harsh, not a part of it.
First, you need to use your EQ to carve out a home for the vocal within the other instruments. The sweet spot is usually somewhere around 1-3 kHz, which is right where our ears are most sensitive. Make small, tight cuts in competing instruments—think guitars, pads, or synths—right in that frequency range. This creates a "pocket" for the vocal to live in.
Next, get that vocal's dynamic range under control with a compressor. This makes sure the quiet, breathy words don't get lost and the loud, powerful notes don't jump out and smack the listener in the face.
And a final pro tip? A little bit of saturation can add harmonics that help the vocal slice through the mix without actually making it louder. It's all about making space, not just brute force.
This is an incredibly common problem, and thankfully, the fix is simple but powerful. It’s almost always caused by a buildup of low-frequency gunk in your reverb.
The solution? EQ your reverb return channel.
It's that easy. Just place an equalizer plugin after your reverb on its aux track. Slap a high-pass filter on there and cut out everything below 150-300 Hz. This instantly gets rid of the rumble and mud that was making your reverb clash with the kick and bass. This one tiny move will clean up the entire low end of your mix. Seriously.
You can also try using a low-pass filter to gently roll off some of the super-high frequencies, maybe around 8-10 kHz. This can make the reverb sound a bit darker and less synthetic, pushing it back in the mix and letting the main vocal stay crisp and up-front.
A great mix deserves a great master. CarMaster is an AI mastering service built to make your music sound incredible in the car—where most people are actually listening. We dial in your track's loudness, tighten up the bass, and fix the stereo image so it translates perfectly, avoiding the nasty phase issues that wreck so many other masters. Get a free, instant preview and hear the difference for yourself at https://www.carmaster.io.

.png)