
You can have the best performance of your life, but if you walk into the studio unprepared, you’re just wasting time and money. Seriously. The real magic of a great recording session starts long before anyone hits the record button. It’s all in the pre-production.
This is the phase where you lock down your song's structure, nail the tempo, and decide on the key. Think of it as creating a blueprint for your track. It's about making all the tough decisions before the studio clock is ticking and your wallet is shrinking. The goal? Walk in, plug in, and play. No debates, no last-minute arrangement changes. Just pure, creative focus.

I've seen it a hundred times: the most successful studio sessions are always the best prepared. Pre-production is where you turn those loose ideas floating around in your head into a concrete game plan.
It’s where you answer all the critical questions upfront. What's the final BPM? Is that verse-chorus-bridge structure set in stone? What about that tricky transition into the guitar solo? Sorting this stuff out beforehand means you won't be burning expensive studio hours arguing about whether the chorus should repeat twice or three times.
A pro band shows up with more than just their gear. To make life easier for everyone, especially your engineer, you need to bring a few key documents. This isn't just about being organized; it's about clear communication.
Here’s what you should have ready to go:
This kind of prep work ensures that from minute one, the focus is entirely on capturing a killer performance.
One of the most valuable things you can do in pre-production is create a solid demo or "scratch track." This is just a basic, rough recording of the song, probably done in your practice space or home studio. It doesn’t have to sound amazing, but it absolutely must represent the final structure, tempo, and feel of the song.
While we're talking about professional studio work here, getting good at capturing ideas quickly is a skill in itself. Even knowing the basics of mobile audio recording, such as recording a podcast on an iPhone, can sharpen your ability to lay down a useful demo on the fly.
A scratch track is your North Star for the entire session. The drummer plays to it to build the foundation. The bassist locks in with the drums. Every single part is layered on top, using that initial demo as the guide.
This simple recording is your safety net. It keeps the session on track and makes sure every musician is playing to the same vision. By putting in this work upfront, you’re setting yourself up for a session that’s productive, creative, and way less stressful.
The first choice you make—the microphone—is maybe the most important one in the whole recording chain. It's the very first step in taking a real-world performance and turning it into something you can actually work with in your DAW.
Think of mics like a painter’s brushes. You wouldn't use a giant roller to paint a tiny detail, right? Same idea. The mic you pick completely changes the texture and color of the sound you capture.
The good news is, while there are a million mics out there, they pretty much all fall into three main buckets: dynamic, condenser, and ribbon. Each one has its own personality and its own job it's best at. Getting a handle on what makes them different is key to making the right call in the studio.
Dynamic mics are the tanks of the audio world. Seriously, you could probably hammer a nail with a Shure SM57 (please don't), and it would still work. They're built to handle seriously loud sounds—what we call high Sound Pressure Levels (SPL)—without breaking a sweat.
This is why you'll almost always see them shoved in front of snare drums, toms, and screaming guitar amps. That SM57 is legendary for grabbing the aggressive crack of a snare without turning it into a distorted mess. For vocals, something like the Shure SM7B has a warm, smooth character that's become a staple for everything from rock anthems to podcasts. They just work.
Condensers are the polar opposite. They're all about sensitivity and detail, picking up every little nuance and high-frequency shimmer that a dynamic mic might just ignore. If you need absolute clarity, you're probably reaching for a condenser.
When you need to capture every subtle breath in a vocal or the delicate, shimmering decay of an acoustic guitar, a large-diaphragm condenser is almost always the right tool for the job.
Big, classic mics like the Neumann U 87 are famous for the rich, larger-than-life sound they give to vocals. Smaller "pencil" condensers are perfect for things like drum overheads or stringed instruments where you want that airy sparkle.
The only catch? Their sensitivity means they'll pick up everything, so you need a quiet room. They also need a little juice to run, which comes from the +48V phantom power button on your preamp or audio interface.
Ribbons are the old-school cool kids. This is the original microphone technology, and they're loved for their incredibly warm, smooth, and natural sound. They have this distinct "vintage" character that’s amazing at taming harsh high frequencies.
Got a guitar amp that sounds a little fizzy or harsh? A ribbon mic like the Royer R-121 will smooth it right out. They're also incredible for brass instruments or even for capturing the natural sound of a room.
The old ones were famously fragile, but modern designs are much tougher. They offer a unique color that nothing else can quite replicate, rounding out the essential mic toolkit for any serious recording session.
Okay, so you've nailed down your pre-production, and your sonic toolkit is ready to go. Now for the really fun part: tracking. This is where we go layer-by-layer, instrument-by-instrument, and start building your song from the ground up. We’re taking that roadmap you made and turning it into actual music, focusing on capturing clean, powerful performances that feel alive.
The whole game here is about starting with a rock-solid foundation. You wouldn’t build a house on shaky ground, right? Same thing with a song. That’s why pretty much every session I’ve ever been a part of starts with the rhythm section.
Everything hangs on the groove. Getting the drums and bass guitar locked in first gives you the rhythmic and harmonic bedrock for everything else to sit on. It’s all about establishing a strong, consistent pulse right from the jump.
Typically, the drummer will play along to the scratch track you made earlier. Their only job is to deliver a take with unshakable timing and the right kind of energy for the song. Once you’ve got a killer drum take in the bag, the bassist comes in to lock their part right into the kick and snare, creating that pocket. That powerful one-two punch sets the entire feel for the track.
Prioritizing the rhythm section isn't just about recording parts; you're carving out the song's core energy. When the drums and bass are tight, every other instrument you add on top is easier to record and just sounds better.
With the foundation poured and set, it's time to add the color. This is where we layer in the guitars, keyboards, strings, or whatever else makes up your song's harmony and melody. This is where the track’s personality really starts to show.
Don't get caught up in chasing one single "perfect" take from start to finish. It’s way more common—and effective—to record multiple takes for each part. Focus on getting great performances for different sections. Maybe you nail the verse on one pass and the chorus on another.
This leads us to the art of comping, or composite editing. The engineer will literally stitch together the best bits and pieces from several different takes to create one seamless, "super" performance. For example, we might grab:
This is a standard studio trick for getting polished, professional results without killing the natural feel of the performance.
The infographic below gives you a sense of what it takes to capture a great vocal, which is often one of the most critical parts of the tracking process.
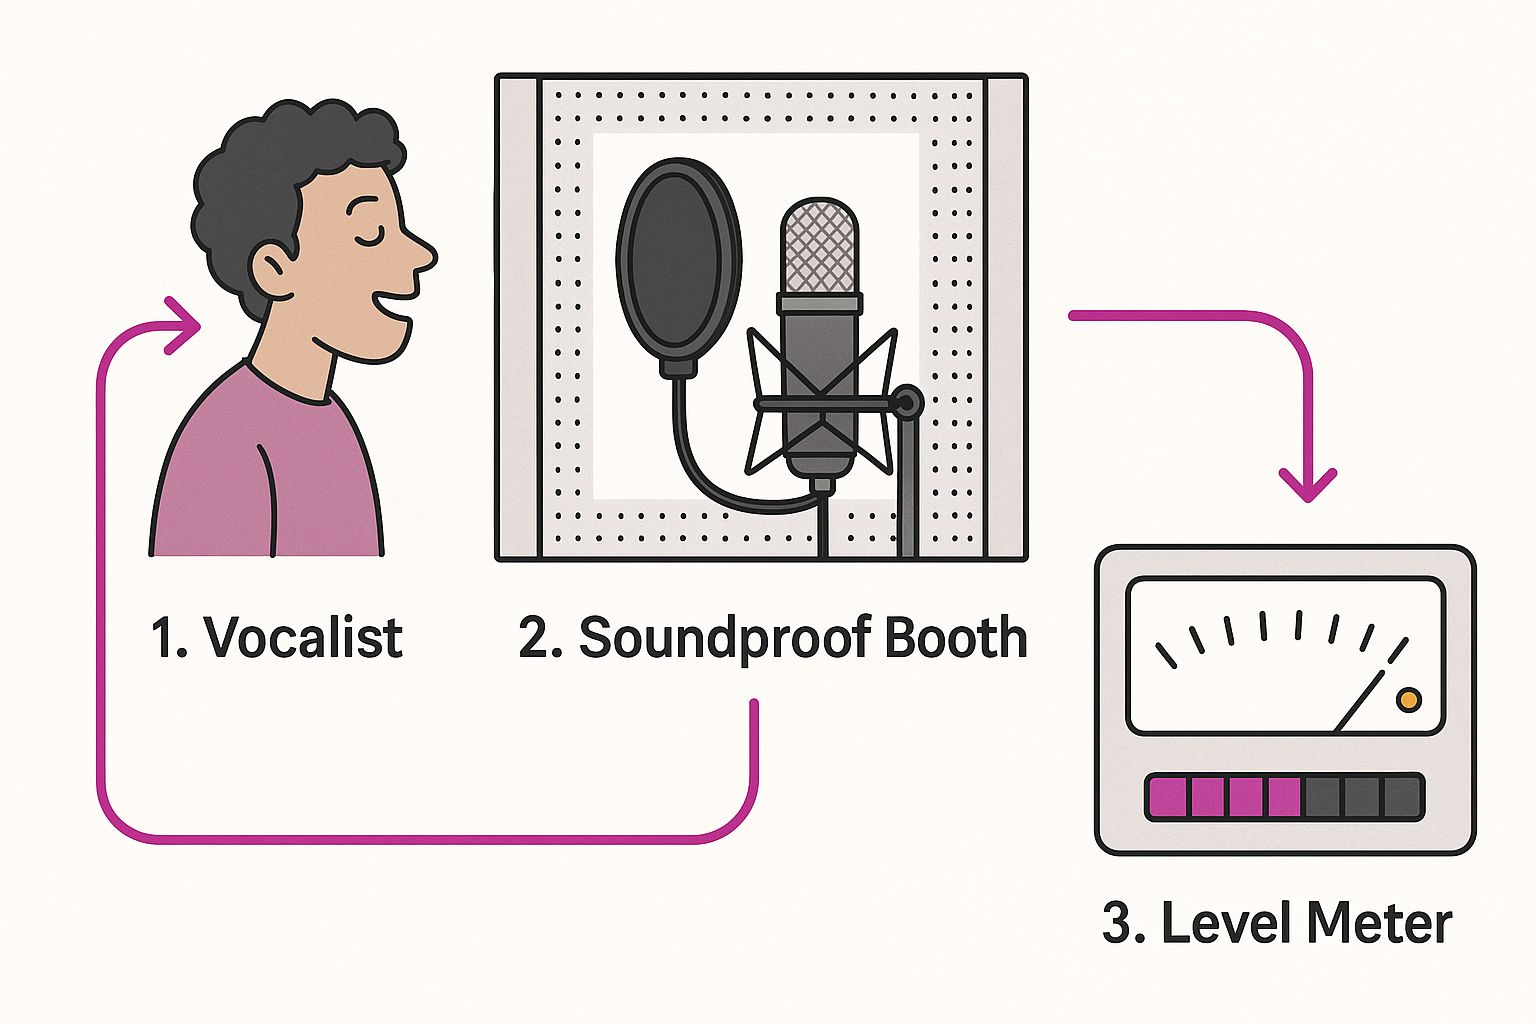
As you can see, getting that clean, isolated sound is key. You want to hear the singer, not the room.
To give you a clearer picture, here’s a common sequence for tracking instruments in the studio.
Tracking PhaseInstrumentsPrimary GoalFoundationDrums, BassEstablish a rock-solid rhythmic and harmonic groove.HarmonyRhythm Guitar, KeyboardsBuild the core chord structure and harmonic texture.MelodyLead Guitar, Synths, StringsAdd lead lines, counter-melodies, and sonic ear candy.VocalsLead Vocals, Backing VocalsCapture the emotional centerpiece and vocal harmonies.
While this order is a great starting point, every song is different. The key is to build logically from the ground up, ensuring each new part has a solid base to lock into.
Finally, we get to the vocals—the emotional heart of the song. A comfortable singer is a good singer, so getting their headphone mix just right is absolutely crucial. They need to hear themselves clearly against the key instruments to really deliver.
Vocal sessions can be a real workout, so managing energy is vital. Don’t be afraid to take frequent breaks to rest the voice and keep the focus sharp. And just like with the instruments, comping is your best friend. It lets the singer focus on the emotion and delivery without the pressure of getting every single line perfect in one go.
The goal is to piece together a lead vocal that’s technically clean but, more importantly, emotionally powerful. This is the centerpiece of your track. Once it's recorded, the next step is making it shine in the mix, and for that, you’ll definitely want to know how to EQ vocals effectively.
You’ve captured every instrument and vocal performance. Awesome. Now the real work begins. The creative explosion of tracking is over, and it's time to shift from creation to curation. You're staring at dozens of audio files that need to be wrangled into something that actually resembles a song.
This is where the unglamorous but absolutely essential work of editing and creating a rough mix comes in.
A rough mix is exactly what it sounds like—a quick, no-frills balance of all your tracks. We’re not aiming for perfection here. The goal is just to get a first impression of the song as a whole. Simply by pushing faders up and down and panning things left or right, you start to get a feel for how the kick and bass lock in, or how the lead vocal carves out its own space against the guitars.
Before you can even think about mixing, you need clean, solid tracks. This editing stage is all about sweating the details and polishing each performance until it’s tight and professional. It’s the invisible labor that makes a recording feel truly great, not just good.
Most of this work falls into a few key areas:
A well-edited track is the foundation of a great mix. It allows the engineer to focus on the creative aspects of mixing, like tone and space, instead of fixing technical problems in the recordings.
This meticulous cleanup makes sure every single element in your song is clear, powerful, and intentional.
Once the timing is locked and the noise is gone, the last editing job is to make sure every audio clip flows smoothly into the next. Abrupt starts and stops are jarring to the listener, so engineers use fades and crossfades to create seamless transitions. A tiny fade-in can soften the attack of a guitar part, while a crossfade can blend two different vocal takes together without any audible click or pop.
This is also when a good engineer gets the session organized for the mix. Tracks are color-coded, labeled clearly (no more "Audio_01_final_final_v2"), and grouped into logical folders—drums, bass, guitars, vocals. It might seem tedious, but this organization is a lifesaver when you’re deep in the final mix.
The modern music world demands this level of polish. The US recording industry hit a record $17.1 billion in 2023, and that growth is almost entirely driven by streaming services where listeners expect flawless quality. You can check out more stats about the US music market on soundcharts.com.
A solid rough mix is also the perfect time to start thinking about dynamics. A touch of compression can help even out performances, gluing them together and making them sit more consistently in the mix. If you're new to the concept, you can learn all about what compression does in music in our detailed guide. This initial balance gives you a fantastic starting point for the final, detailed mix.
After all the blood, sweat, and tears of tracking, editing, and mixing, you're finally on the home stretch. Getting your track ready for mastering is more than just a technical step—it's the critical handoff that gives the mastering engineer the raw material they need to make your song shine.
Think of it like this: you've baked the cake, and now you're handing it off to a specialist to handle the final, intricate icing. You want to give them the best possible cake to work with.
Your main job here is to export, or "bounce," your final mix. This is not the time to create a quick MP3. The undisputed industry standard is a WAV file. It's uncompressed, meaning it contains every last bit of audio data from your session. A format like MP3 throws away information to keep file sizes small, which is the absolute last thing you want at this critical stage.
When you go to export your mix, your DAW will present you with a few options. Nailing these settings is vital to preserve all the hard work you've put in.
Basically, you’re trying to hand over a perfect, high-resolution digital master of your mix. You wouldn't give a photocopy of a painting to the person framing it, right? Same idea.
If you remember only one thing from this guide, make it this: leave some headroom. This simply means the loudest parts of your song shouldn't be slamming up against the digital ceiling of 0 dBFS (decibels full scale). Pushing your levels "into the red" creates digital clipping, a nasty, brittle distortion that even the best mastering engineer can't fix.
The sweet spot for your mix's peaks is somewhere between -6 dBFS and -3 dBFS. This gives the mastering engineer plenty of room to apply their tools—like EQ, compression, and saturation—without instantly running into clipping issues.
Oh, and one more thing. Make sure to turn off any limiters or maximizers on your master fader before you export. The entire point of mastering is to bring the track up to a competitive loudness. Sending a file that's already squashed ties the engineer's hands and can lead to a lifeless, over-compressed final product.
By giving them a clean, dynamic mix, you're setting them up for success. Understanding the components of a professional audio mastering chain helps clarify why this headroom is so essential.
This final step has never been more important. With global recorded music revenues hitting $29.6 billion in 2024 and streaming revenue topping $20 billion, the competition is fierce. You can learn more about global music revenue growth from IFPI. Giving your mastering engineer the right file is your best shot at making your music stand out on Spotify, Apple Music, and beyond.
Going into your first professional studio session can feel a bit intimidating. It's totally normal. To take some of the guesswork out of it, I've put together some answers to the questions I hear most often from artists before they hit the record button.
Studio rates are all over the place. You'll see prices driven by the studio's location, the engineer's reputation, and of course, the quality of the gear in the racks. Expect to see numbers anywhere from $50 to $500 per hour.
For a single song, that means you could be looking at a few hundred bucks on the low end, or even several thousand for a really dense, complex production. The best thing you can do is have a frank conversation with the studio about rates and what you're trying to accomplish to get a real-world estimate before you commit. No surprises.
This one really comes down to the song's complexity. If you're a solo artist with an acoustic guitar, you might be in and out in just a couple of hours.
But if you're tracking a full band with layers of vocal harmonies, intricate guitar solos, and a bunch of different instrumental parts, that could easily stretch into a multi-day session. A good rule of thumb is to budget somewhere between 8 and 20 hours per song. That usually covers everything from setting up mics and tracking all the parts to getting a basic mix together. The #1 way to save time? Show up prepared.
The more prepared you are, the less time you'll waste. I've seen a well-rehearsed band with clear charts knock out in one day what an unprepared group might struggle with for three.
Yes. 100% yes. While any decent studio will have a great selection of high-end equipment, your personal gear is a huge part of your signature sound.
Bring the instruments, amps, and effects pedals that are core to your tone. That specific guitar you love or that quirky vintage keyboard is part of what makes you, you. Just make sure to give the studio a heads-up on what you're bringing. This lets the engineer plan the setup ahead of time and helps the session kick off without a hitch.
Sometimes, tech plays a role in the modern workflow too. For instance, if you're trying to get a quick lyric sheet from a vocal take or need to transcribe a spoken word intro, knowing about modern audio to text AI tools can be surprisingly handy in a studio environment.
Ready to make sure your final track sounds incredible everywhere, especially in the car? CarMaster is the only AI mastering service designed to protect your song from sounding bad on automotive sound systems. Get a free, instant preview and hear the difference for yourself at https://www.carmaster.io.

.png)