
EQ in audio mastering isn't about making dramatic, sweeping changes. It's the art of the subtle tweak—tiny, high-impact adjustments that nudge a great mix into the realm of a professional master. This is where we correct small tonal imbalances and bring out the track's overall character, making sure it sounds incredible everywhere.
The biggest mental shift is moving from a mixing mindset to a mastering mindset. Forget about shaping individual instruments; now, we're polishing the entire, finished song.
Equalization is the absolute foundation of mastering for one simple reason: it directly controls the tonal balance of your music. While compressors and limiters handle the dynamics, EQ is what shapes the sonic texture—the very thing listeners connect with emotionally. It’s how you get every frequency to play nice together.
The tools for this are big business. The global market for equalizers is projected to hit USD 2.5 billion by 2033, a number fueled by the more than 3.2 million music creators in the U.S. alone who depend on these plugins. If you want to dig deeper into these numbers, you can find more insights on the equalizer audio market at Accio.
Think of it like adding the final coat of varnish to a painting. You’re not changing the image itself. You're just making the colors richer and the details pop, ensuring the song feels complete and ready for the world.
One of the most common mistakes I see is engineers applying mixing techniques during a mastering session. In a mix, you might carve out a harsh frequency on a guitar with a bold 6 dB cut. Do that in mastering, and you've just ripped a massive hole in the entire song. A move that drastic is almost always a sign that you should go back and fix it in the mix itself.
Mastering requires a completely different philosophy.
Before we dive into techniques, it's crucial to understand the fundamental differences between using an EQ for mixing and for mastering. They serve entirely different purposes and demand distinct approaches.
This table is a good gut check. If you find yourself reaching for narrow-Q boosts or making massive cuts, you've probably slipped back into a mixing mindset.
In mastering, we live by a few core principles:
The job of a mastering engineer is not to "fix" the mix with EQ, but to enhance it. The goal is to make the song the best possible version of itself, ensuring it translates powerfully and consistently across all listening systems.
For example, a tiny high-shelf boost can add that professional sparkle and "air," making the whole track feel more open and expensive. A gentle low-end cut might be all it takes to clear out some subtle mud, letting the kick and bass punch through with more definition. It's these small, informed decisions that separate a good master from a great one.
Before you even touch a single frequency, you need a plan. A deliberate, methodical setup is what separates the amateur results from a professional master. Your environment, your tools, and your workflow dictate every decision you make, so getting this part right is non-negotiable.
First, let's talk about the big EQ debate: linear-phase vs. minimum-phase. Knowing when to reach for each is a huge part of the mastering game.
A really common pro workflow is to use both. Start with a linear-phase EQ to clean up any problem spots, then follow it with a minimum-phase EQ for all the creative, colorful stuff.
You can't make good EQ decisions without objective feedback. Your ears will lie to you, especially after a few hours in the chair, so think of your metering tools as your unbiased copilot.
Slap a high-quality spectrum analyzer at the very end of your mastering chain. This is crucial—it shows you the true frequency content after all your processing, not before.
Right alongside it, you'll need a LUFS meter to keep an eye on perceived loudness. As you make EQ moves, especially boosts, your LUFS readings will climb. Watching this meter ensures your EQ decisions are actually improving the tonal balance, not just tricking your brain by making the track louder. If you want to see exactly how these tools fit together, our guide on the ideal audio mastering chain breaks it all down.
Metering isn't about mastering with your eyes. It's about confirming what you hear. If you hear a muddy buildup in the low-mids, your spectrum analyzer helps you find that exact frequency and fix it with surgical precision.
Finally, let's talk gain staging. Before you even think about dropping a plugin on the track, make sure your mix is peaking somewhere around -6 dBFS to -3 dBFS. This gives you plenty of headroom, which is just the space your mastering plugins need to work their magic without causing nasty digital clipping.
The last piece of the puzzle is your A/B referencing setup. This is a game-changer. Load a few commercially released, well-mastered tracks from a similar genre into your session. Use a plugin that lets you instantly flip between your master and the reference tracks—make sure they're matched in volume! This simple trick is the single best way to keep your ears honest and stop you from chasing a sound that just won't translate to the real world.
Alright, with our setup dialed in, it’s time to get surgical. This is the corrective part of mastering EQ, where we play detective and hunt down the specific frequencies making an otherwise solid mix sound amateur. Forget broad strokes for a minute—this is all about precision problem-solving.
This is where you really start to train your ears. You'll learn to spot common issues like harshness, mud, or that dreaded "cardboard box" sound. An experienced ear can catch things a spectrum analyzer might miss, turning a good mix into a truly great one.
The classic method for this is the "sweep and find" technique, and for good reason. It’s brutally effective. You just create a narrow EQ band with a pretty significant boost—think +6 dB to +8 dB—and slowly drag it across the frequency spectrum. As you move, you’ll hear certain frequencies just leap out in the worst way possible.
When a nasty resonance, a piercing whistle, or a muddy buildup makes you wince, you’ve found your target. Now, just flip that boost into a cut. Often, a super-narrow cut of just 1-2 dB at that exact spot is all you need to clean up the problem without messing with the frequencies around it.
Of course, this kind of precision work is only possible with a solid workflow, which is why getting your session set up correctly from the start is so important.
The infographic below gives a great overview of the foundational workflow for setting up an EQ session, covering everything from proper staging to metering and referencing.
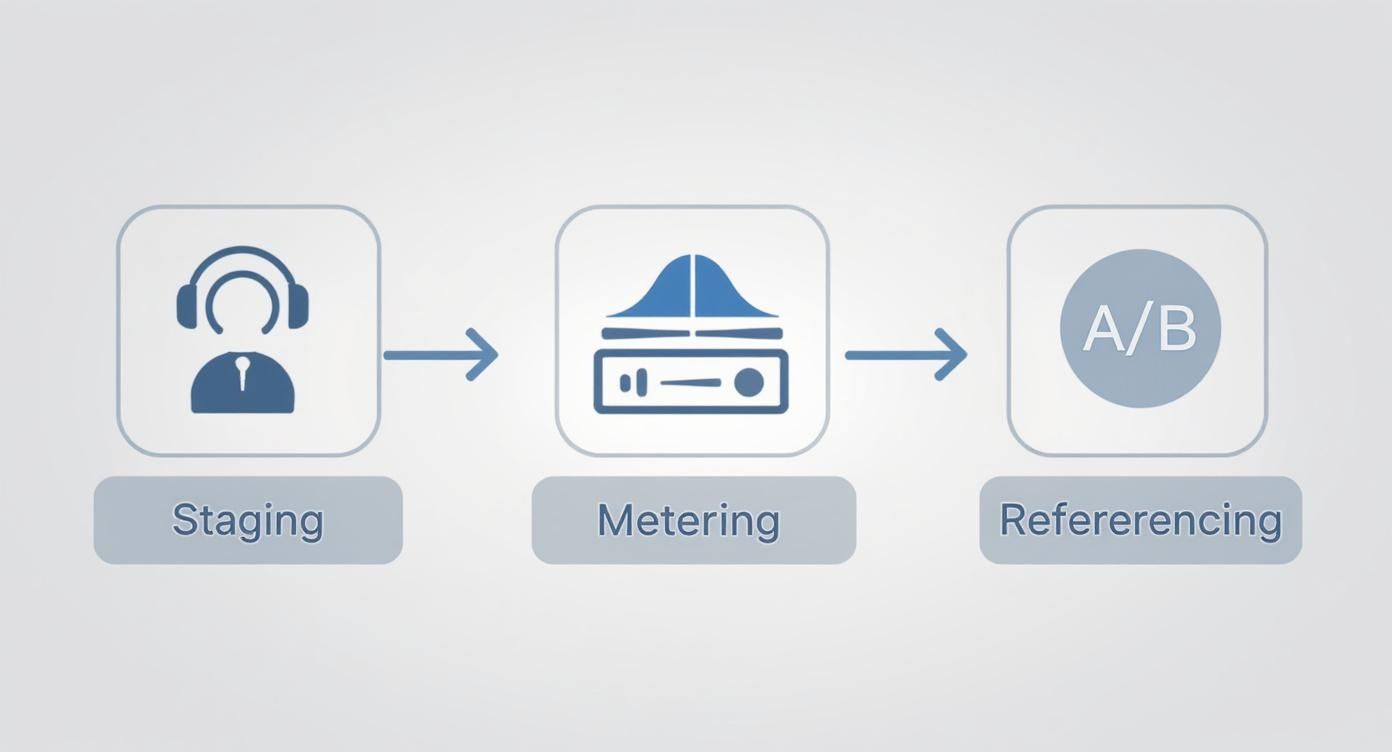
Think of this as your pre-flight checklist. A structured approach like this is what allows you to perform surgical EQ moves with confidence and get clean, professional results.
Every track is different, but sound frequencies are a lot like neighborhoods—some just attract more trouble than others. Knowing where to look first can save you a ton of time. For example, if your mix feels like it's hiding under a blanket, you’ve likely got a buildup in the low-mids. If that sounds familiar, digging into why a song sounds muffled can give you some great context.
Here are a few of the usual suspects to keep an ear out for:
Don’t just cut because you think you should. Constantly A/B with the bypass button. A great corrective EQ move is one you can’t even tell is there—the problem just vanishes.
As you get more experienced, you'll start to recognize these problem areas almost instantly. To help you get there faster, I've put together a quick cheat sheet for common issues and their typical solutions.
This table maps out some of the most frequent sonic issues we encounter during mastering and the typical EQ adjustments used to fix them.
Use this as a starting point, but always let your ears be the final judge. Every track has its own unique fingerprint.
Here’s a common scenario: a problem frequency isn't there all the time. It only rears its ugly head when a certain instrument hits hard—like a snare that gets painfully sharp on the backbeat or a vocal that becomes harsh only on the loudest notes.
This is where a dynamic EQ becomes an absolute lifesaver.
Instead of making a static cut that dulls that snare for the entire song, you can set a dynamic EQ to only kick in when needed. You can tell it to dip that harsh frequency (let's say 3.5 kHz) by a couple of dB, but only when the signal at that frequency crosses a certain volume threshold.
The result is pure magic. The snare keeps its life and crack during the verses, but the harshness is automatically smoothed out during the loud chorus. It's the kind of subtle, powerful control that separates good masters from incredible ones.

Alright, the surgical work is done. Now we get to switch from technician to artist. Creative EQ is where you stop just fixing things and start shaping the vibe and emotion of the track. This is the fun part—painting with broad, musical strokes to bring out the song's real character.
Forget hunting for tiny problem spots with a narrow Q. Here, we're using wide, gentle curves to add things like weight, air, and presence. It might not sound like much, but a half-decibel boost with a quality audio mastering eq can totally change the emotional feel of a song.
This stage is all about instinct. You're listening for what the song wants to be and using your EQ to help it get there.
Two of the most common moves you'll make in creative mastering are adding "air" and "weight." They're classics for a reason: they just work. It's that final polish that listeners feel, even if they can't quite put their finger on it.
The secret to great creative EQ is that the best adjustments are felt more than they're heard. You don't want someone to say, "I love that boost at 120 Hz." You want them to say, "This track just feels amazing."
This is also where the sonic flavor of your EQ—whether it's hardware or a plugin—really shines. A clean digital EQ gives you a modern, precise lift. But if you reach for an emulation of something like a classic Pultec tube EQ, you're not just boosting a frequency; you're adding its signature warm harmonics and color, which is an incredible effect on its own.
Your creative decisions have to serve the song's genre. What works for a quiet folk song would completely wreck an aggressive rock track. It's all about context.
Let's look at a few real-world examples:
Every one of these moves is about enhancing what's already in the mix. You're working with the music, not fighting it. Your audio mastering eq becomes a tool to highlight the track's best features and guide the listener on an emotional journey. This is where a good master becomes a great one.
The core concepts of EQ haven't changed much over the years, but the tools we use and the formats we master for are in a constant state of flux. Right now, two massive shifts are redefining what's possible with a mastering EQ: the rise of artificial intelligence and the explosion of immersive audio. These frontiers are forcing engineers like us to adapt and evolve our craft.
AI-powered tools have popped up incredibly fast. We're seeing a huge trend of AI integration in mastering plugins, with some estimates suggesting a 42% increase by 2025. These tools will analyze your track and spit out a suggested EQ curve, which can actually be a pretty useful second opinion. You can find some more great insights on these trends over at Mastering The Mix.
But—and this is a big "but"—you have to treat these AI suggestions as just that: suggestions. If you just slap the AI curve on and call it a day, you'll end up with generic, cookie-cutter masters. The real trick is to use AI as a diagnostic tool, a quick way to flag potential harshness or mud that your ears might have missed.
The best way to approach an AI mastering EQ is to think of it as a highly skilled (but not always musical) assistant. It’s not an automated “master my track” button; it’s a guide pointing you in the right direction.
Here’s how I use them in my workflow:
The real power of AI in mastering isn’t about replacing your ears; it’s about augmenting them. Use the data-driven analysis to inform your creative choices, not to make them for you. At the end of the day, your musical intuition has to have the final say.
Beyond AI, the growing demand for immersive formats like Dolby Atmos throws a whole new set of EQ challenges our way. Mastering for stereo is one thing. Mastering for a three-dimensional space with speakers all around you? That's a completely different ballgame.
In an immersive mix, one little EQ move can create a ripple effect across the entire soundstage. A boost that sounds perfect in the front speakers might suddenly make an element in the rear channels feel brittle or overpowering.
The game shifts from a simple left-right balancing act to maintaining clarity and coherence from every single angle. It demands a much more delicate touch, often involving object-based EQ and a deep understanding of how frequencies interact in a real, physical space. It’s a complex new world, but it’s an incredibly exciting evolution for the art of mastering.
So, you’ve got your master sounding incredible in the studio. Everything is balanced, punchy, and clear. But that’s only half the job.
A truly great master doesn’t just sound good on your expensive monitors; it has to hold up everywhere else. From a rattling car stereo to tinny phone speakers, this is where your work proves its worth. Skipping this final, real-world testing phase is a rookie mistake.
Think of it like a chef who only tastes their own cooking in their own kitchen. You’d never send a dish out without knowing how the customer will experience it. The same goes for music. You need feedback from the exact environments where people will actually listen, because these places expose flaws that your perfectly treated room is designed to hide.
There’s a good reason the "car test" is a rite of passage for audio engineers. Car interiors are an acoustic nightmare, notorious for bloating and exaggerating low-mid frequencies, usually in the 150 Hz to 400 Hz range. A track that sounds tight and controlled in your studio can turn into a boomy, undefined mess the second you hit the road.
This is your ultimate reality check for the low end.
If you hear a major problem in the car, fight the urge to go back and make a huge, drastic change. The fix is almost always a tiny, surgical cut with your mastering EQ. Often, just a 0.5 dB to 1 dB dip is all it takes to tame the boom without gutting the track on other systems.
While the car is king for checking your low-end, it's just one stop on your quality control tour. To get the full picture, you need to hear how your master translates across a whole range of common playback devices. The goal is to find that perfect sweet spot where the track sounds solid on everything.
Make a little checklist and listen critically on each of these systems:
Once you’ve gathered notes from all these different sources, you can head back to your session for those last, tiny tweaks. It's this obsessive attention to detail that ensures your music truly connects with listeners, no matter where or how they’re hearing it.
If you want to dive deeper into the technical targets for this process, understanding the right audio mastering levels is essential for getting your track ready for every platform out there.
You're not alone. The world of mastering EQ is full of "it depends" answers, which can be frustrating when you're just trying to get a track finished. Let's clear up some of the most common questions that pop up during mastering sessions.
Think of this as a good starting point for the technical stuff. If you want to dive deeper into the broader world of audio production, you can always explore the playpause.io blogs.
Honestly, the answer comes down to what you're trying to accomplish. They're two different tools for two different jobs, and most pros use both.
Linear Phase EQ is your go-to for surgical work. Think of it as a scalpel. When you need to make precise, corrective cuts on material with sharp transients (like drums or percussion), this is your best bet. Its big advantage is that it doesn't introduce any phase shift, which keeps the punch and timing of your mix perfectly intact. Just be careful—aggressive moves can create "pre-ringing" artifacts that might soften those very transients you're trying to preserve.
Minimum Phase EQ is all about broad, musical strokes. This is your paintbrush. When you want to add a bit of warmth, sparkle, or "air," a minimum phase EQ is almost always the right choice. The phase shift it introduces is often what we perceive as sounding more "analog" and musically pleasing. It just feels natural.
The golden rule here is subtlety. Seriously. The vast majority of your boosts and cuts should live somewhere between 0.5 dB and 2 dB.
If you find yourself pushing a frequency band more than 3 dB, that's a huge red flag. It almost always means there’s a bigger issue that needs to be fixed back in the mix itself.
Mastering EQ is the final polish, not a complete overhaul. If you can instantly and obviously hear your EQ changes, you've probably gone too far. Constantly A/B your work to make sure you're actually improving the track, not just making it different.
Mid-Side (M/S) EQ is a seriously powerful technique that lets you EQ the center of your mix (the "Mid") and the stereo edges (the "Side") completely independently of each other. It’s an absolute game-changer for tightening up the low end and creating a wider, more immersive stereo image.
Here's a classic mastering trick:
This simple move cleans up the stereo field by forcing the kick and bass to sit squarely in the center, giving your track a much tighter, more powerful foundation. The best part? It does this without messing with the width of your synths, guitars, or anything else happening on the sides.
You can also do the opposite. Want more width and air? Try a gentle high-shelf boost on just the Side channel. This can make the whole track feel wider and more open without making your lead vocal or snare sound harsh and brittle. It’s all about targeted control.
Ready to make sure your tracks sound incredible in the car? CarMaster uses purpose-built AI to optimize your music for the most challenging listening environment. Get a free, instant preview and protect your song from sounding bad in the car. Try it now at https://www.carmaster.io.

.png)