
Getting your mastering levels right is the single most important step to making sure your music sounds professional on every single platform. It’s not a loudness war anymore; it’s about finding that sweet spot—a clean, dynamic balance that usually hovers around -14 LUFS integrated loudness with a True Peak that doesn't creep past -1.0 dBTP.
This is the modern gold standard. Hitting these targets ensures your track translates perfectly from a high-end studio to Spotify, and even to a car stereo, all without a hint of ugly distortion.
Ever put on a track and wonder why it sounds so powerful and crystal clear, while another one just feels… thin? Or worse, distorted and harsh? The secret is almost always in the final, critical step of setting the mastering levels. This isn't just about tweaking a volume knob; it's the art of putting the perfect frame around your sonic painting before you show it to the world.
Think of mastering as the ultimate quality control. The goal is to present your music in the best possible light, no matter where it gets played. The right levels prevent that nasty digital clipping that ruins a great mix, while still giving your track the punch and competitive energy it needs to stand right alongside commercial hits.
The game has changed a lot over the years. Back in the day, engineers were fighting the physical limitations of tape and vinyl. But the big shift came in the early 1980s when digital audio took over. With the introduction of the compact disc (CD) in 1982, we suddenly had a format with way more dynamic range and way less noise.
This new digital world gave engineers a level of control they'd only dreamed of. They could push loudness without the physical distortions that plagued analog gear. It was a whole new frontier, and you can learn more about how those production techniques have evolved.
Before we get into the nitty-gritty numbers for Spotify or Apple Music, you need to get a handle on the core concepts that define modern mastering levels. Once you understand the "why" behind the numbers, you'll be able to make smart decisions that truly serve your music.
We're going to focus on the two big metrics that have become the industry standard:
Mastering is your last chance to polish a mix and get it ready for the world. Getting the levels right is probably the most crucial part of that job. It’s what guarantees your track sounds consistent and amazing everywhere.
Mastering can feel like a black box of weird numbers and cryptic acronyms. But once you get what they actually represent, it all clicks into place. These aren't just random targets you have to hit; they're the tools that let you measure, shape, and ultimately perfect your track's loudness and punch.
Let's pull back the curtain on the three big metrics you'll see everywhere.
We'll cover LUFS, True Peak, and RMS, using some simple analogies to build you up from the ground floor. Getting a real feel for these concepts is the key to unlocking professional-sounding masters.
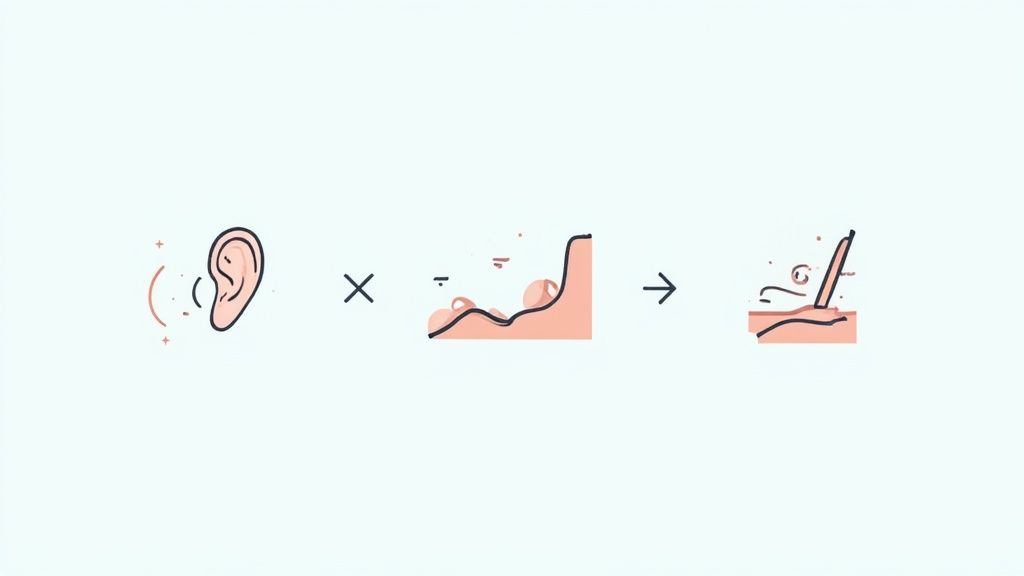
Imagine you're at a coffee shop. One person is telling a long story in a steady, even voice. Another person is quiet, but suddenly yells "HEY!" and then goes silent again.
A basic peak meter would tell you the shouter was "louder" because their one word hit a higher peak. But who would you feel was louder over the course of a minute? The storyteller, right?
That's precisely what LUFS (Loudness Units Full Scale) is all about. Instead of just catching the loudest moments, LUFS listens to your track over time, giving you a number that actually reflects how loud a human ear perceives it to be. It's a much smarter way to measure volume.
This is exactly why Spotify, Apple Music, and all the others jumped on the LUFS train. They need a consistent experience for their listeners, so you don't get your eardrums blown out by a loud track after a quiet one. They use LUFS to normalize everything to a similar perceived level.
You'll usually see three LUFS readings on your meter:
If LUFS is the average volume of that coffee shop conversation, True Peak (dBTP) is the absolute loudest single sound—that one syllable that spiked higher than everything else. It’s the hard ceiling your audio can't break through without causing a total mess.
Think about pouring a drink. The rim of the glass is 0 dBFS (decibels Full Scale), the absolute maximum level in the digital world. You can fill it right to the brim, and you're good. But if a single drop spills over the side, you've got distortion.
That mess is called digital clipping, and it's a nasty, harsh sound you can't undo. True Peak is an even more precise measurement because it's clever enough to see what happens between the digital samples. When your track gets converted back to an analog soundwave, tiny "inter-sample peaks" can pop up that your standard meter might miss. A True Peak meter catches these, saving you from ugly surprises down the road.
Keeping your True Peak at or below -1.0 dBTP gives you a critical safety buffer. It guarantees that when your music is squashed into an MP3 or AAC for streaming, no hidden peaks will push it into the red and cause clipping.
Before LUFS became the industry standard, RMS (Root Mean Square) was how everyone measured average loudness. It gives you a good mathematical average of your track's power over a short window of time, offering a sense of its overall density and energy.
While it's still a decent metric, RMS has a blind spot: it doesn't hear like a human. Our ears are way more sensitive to mid-range frequencies (like vocals) than they are to super low bass or hissy highs. RMS, on the other hand, treats all frequencies equally. This means a track with a massive sub-bass line might show a high RMS reading, even if it doesn't sound all that loud to our ears.
This is where LUFS stole the show. It's designed with frequency weighting that mimics human hearing, so it gives you a much truer picture of perceived loudness. That’s why, even though you’ll still find RMS on plenty of meters, LUFS has pretty much taken over as the main metric for getting your levels right for today’s world.
For decades, the music industry was trapped in a fight to the death known as the "loudness war."
Picture walking into a room where every single person is screaming just to be heard over everyone else. That’s what music became—a brutal race to make every track louder than the last one on the radio or a CD.
This wasn't just about cranking up the volume knob. Engineers were using extreme compression and limiting to literally squash the life out of music. They shaved off all the natural peaks and valleys that create emotion and impact, leaving behind flat, fatiguing tracks with no room to breathe.
Then, platforms like Spotify and Apple Music showed up and completely changed the rules of engagement. They introduced a simple but powerful idea: loudness normalization.
Instead of letting every song blast out at its mastered volume, they started adjusting the playback level of all tracks to a consistent, pre-determined target.
Think of it like a great sound engineer at a music festival. If one band comes on stage and they're deafeningly loud, the engineer pulls their faders down to match the others. If the next act is too quiet, they get a little boost. Streaming services do this automatically, giving listeners a smooth, predictable experience.
This one move made the old loudness war tactics totally obsolete. Why crush your mix into a brick just to be the "loudest" if Spotify is just going to turn it down anyway?
Loudness normalization leveled the playing field. Suddenly, the advantage wasn't with the loudest master, but with the most dynamic and well-balanced one. It was a massive win for artists and listeners alike.
The loudness war had a long and ugly history. Research tracking mastering trends from the 1950s onward shows a steady climb in volume, hitting its peak in the hyper-compressed mess of the late 90s and early 2000s. You can get the full rundown on the history of mastering trends here.
Average loudness levels went from a healthy -14 LUFS in the 80s to a punishing -8 LUFS or even louder. This didn't just make music loud; it stripped it of its soul and made it tiring to listen to.
With normalization now the standard, there's a real incentive to protect your track’s dynamic range. A song with quiet, intimate verses that explode into a massive chorus will actually keep that powerful impact on streaming services.
Meanwhile, a track that’s brick-walled from start to finish will just get turned down, sounding weak and lifeless next to more dynamic music. The new game forces a smarter approach. The goal is no longer to win a volume contest but to create a master that sounds incredible at the platform's target loudness—which for many is right around -14 LUFS.
Understanding this history is key to making the right mastering decisions today. The end of the loudness war doesn’t mean loudness is irrelevant, but it completely redefines what "loud" even means.
Here’s what this new landscape rewards:
Ultimately, the streaming revolution forced a ceasefire. It created an environment where quality and feel trump sheer volume, letting beautifully crafted, dynamic music finally thrive again.
Trying to master for every single streaming platform can feel like you're chasing a moving target. Spotify, Apple Music, YouTube... they all have their own specific playback levels.
But here's the good news: you don't need to create a dozen different masters. The secret is understanding the one thing they all have in common.
Loudness normalization has completely changed the game. This is the system all major platforms use to make sure listeners don't have to keep reaching for the volume knob. It measures perceived loudness using LUFS (just like our ears do) and then adjusts every track to a target level, which is usually around −14 LUFS.
This means that if you slam your master with a limiter to make it super loud, Spotify will just... turn it down. Any "advantage" you thought you gained is gone. This shift has single-handedly ended the "loudness war" and brought dynamics back into focus. In fact, if you look at the data, you'll see the average loudness of commercial hits has settled right around that -14 LUFS mark. You can read a great breakdown of the end of the loudness war if you want to dive deeper.
What does this all mean for you? It simplifies everything. One clean, dynamic, and well-balanced master is all you need for your music to sound great everywhere.
If you're going to pay attention to just one platform, make it Spotify. With over 600 million users, their technical guidelines have become the benchmark for the entire industry. They normalize tracks to a target of roughly -14 LUFS integrated loudness.
So, why -14 LUFS? It's the perfect sweet spot. It’s punchy enough to feel competitive on any system, but it still leaves plenty of room for your track's dynamics to shine through.
When you deliver a master that hits around -14 LUFS with a True Peak of -1.0 dBTP, it sails through Spotify's system without being altered. Your listeners hear it exactly as you intended. Simple as that.
If you push your master louder than that, Spotify turns it down, which can make an over-compressed track sound weak and lifeless next to something more dynamic. On the flip side, if your master is way too quiet, they'll turn it up, potentially bringing up the noise floor with it. Hitting the target is your safest bet.
Aiming for the -14 LUFS integrated and -1.0 dBTP standard is the modern best practice. It’s a universal key that unlocks great sound on virtually every streaming platform, not just Spotify.
While -14 LUFS is a fantastic universal target, it's still good to know the specific numbers for other big players. Most are right in the same ballpark, but there are some slight differences. Think of this as a quick-reference guide to the digital world your music is about to live in.
Below is a cheat sheet with the most common targets. You'll notice they are all incredibly close, which just reinforces the idea that one great master is all you really need.
This table provides a quick-reference guide to the recommended integrated LUFS and maximum True Peak levels for the most popular music streaming services.
See the pattern? The vast majority of people will hear your music normalized somewhere between -14 and -16 LUFS. This consistency is your biggest advantage as a producer.
Back in the day, you might have made separate masters for CD, vinyl, and iTunes. For streaming, that's completely unnecessary. The modern workflow is all about creating a single, high-quality file that works everywhere.
Here’s the simple, powerful strategy for it:
Follow these steps, and you'll have a pristine WAV file ready for universal distribution. Upload it once, and rest easy knowing your listeners will get a consistent, professional experience, no matter where they hit play.
All the theory in the world doesn't mean much until you put it to work on your own tracks. So, let's walk through a simple, repeatable process for setting your mastering levels in any DAW. This is how you move from guesswork to a confident, professional workflow.
At the heart of this process are just two tools: a solid loudness meter plugin and a high-quality limiter. These will be the last two plugins on your master bus, giving you the visual feedback and precise control you need to nail the perfect levels every single time.
First things first, drop your loudness meter plugin at the very end of your mastering chain. This is non-negotiable. You need to see what's happening to your audio after every other plugin has done its job. Think of this meter as the final dashboard for your track.
Right before that meter, place a true-peak limiter. This is the tool you'll use to actually shape the final loudness and set your absolute ceiling. For a complete look at how this fits into the bigger picture, it's worth checking out guides on how to master audio effectively.
Your final master bus setup should be simple:
Alright, find the loudest part of your song—usually the main chorus or the drop—and put it on a loop. As it plays, start pushing the input gain or lowering the threshold on your limiter. Watch the Integrated LUFS reading on your meter; you'll see it start to climb.
Your goal is to bring that integrated loudness up to around -14 LUFS. This has become the unofficial industry standard, mostly because it aligns perfectly with Spotify's loudness target. Don't drive yourself crazy trying to hit -14.0 on the dot. Anything in the -15 LUFS to -13 LUFS range is a great professional sweet spot.
As you're pushing the loudness up, there's one more critical setting on your limiter.
Set your limiter’s output ceiling to -1.0 dBTP (decibels True Peak). This is a must-do step. It creates a small but crucial safety buffer that prevents the nasty digital distortion and clipping that can happen when your audio gets converted to streaming formats like MP3 or AAC.
This one setting keeps your master clean across every platform. You don't need fancy plugins to start, either. Most DAWs have great stock limiters and meters, but free options like Youlean Loudness Meter or Loudness Meter by MeldaProduction are fantastic too.
This chart gives you a quick visual of the target levels for the big streaming services.
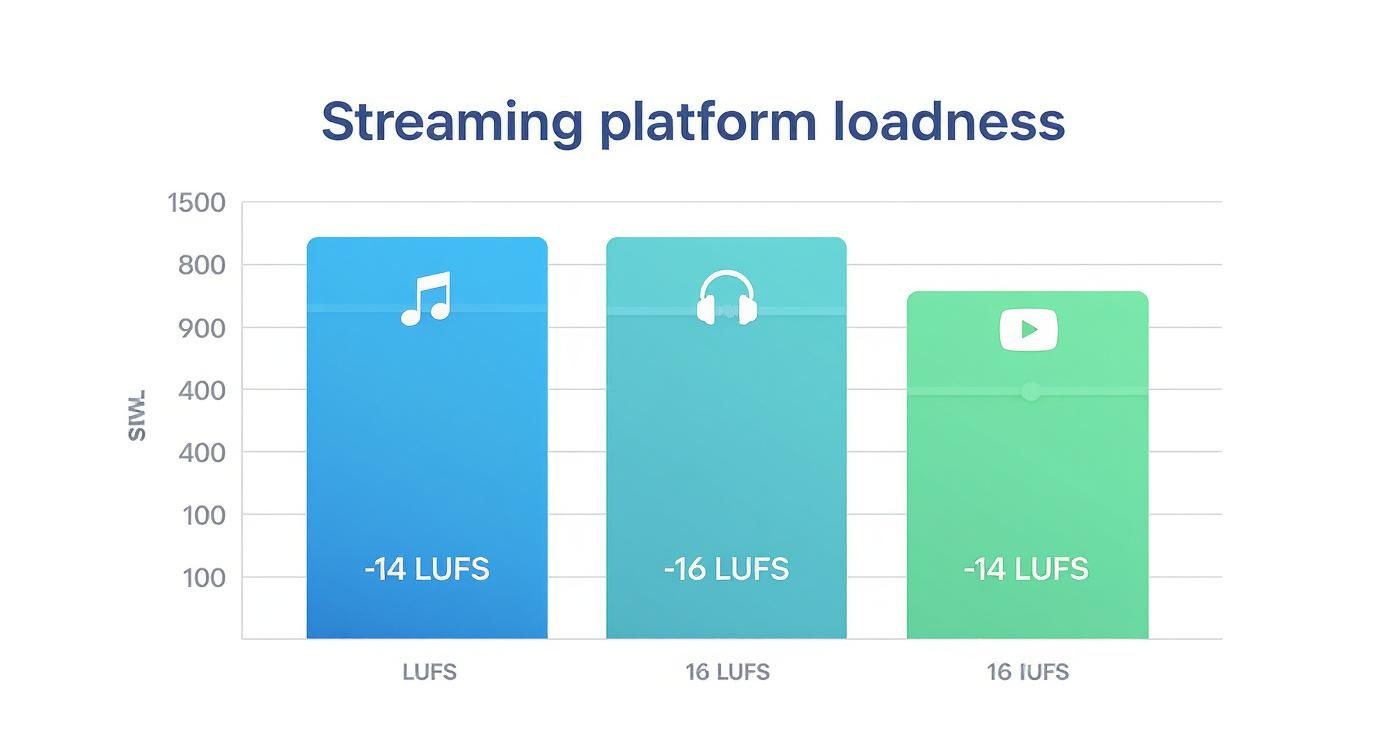
As you can see, almost everyone is hovering right around that -14 LUFS mark, which is why it’s such a reliable and universal target to aim for.
Once your levels look right, it's time for the most important quality check of all: A/B testing. This is where you compare your master directly against a few well-mastered commercial tracks in the same genre.
Drag a high-quality WAV or AIFF file of a reference track into your session on a separate channel. Now, match its volume to your master so you're comparing them at the same perceived loudness. This is crucial for getting an honest comparison.
Listen closely for a few key things:
This is your reality check. It’s the step that gets you out of "staring at the numbers" mode and forces you to actually trust your ears. By following this whole process, you build a system you can rely on for every track you master. And if you're curious about the specific plugins that go into this, check out our guide on building the ideal audio mastering chain.
Before you even think about hitting that final export button, let's talk about the last-minute quality check. This isn't just a suggestion—it's what separates a confident release from a "what-if" nightmare.
Think of it like a pilot's pre-flight inspection. It's a simple routine that catches common, easy-to-miss mistakes and ensures your music has a smooth journey to your listeners' ears. This checklist is your safety net, making sure all your hard work gets the polished, professional delivery it deserves.
Making this a habit guarantees your mastering levels are on point, every single time. It's that final step to ensure your track translates beautifully from your studio out into the world.
First things first, let's get the numbers right. Your metering plugins are your best friends here. They give you the cold, hard data you need to sign off on the technical side of the master. Don't rush this part. Give your track one final, focused listen from start to finish with your meters in plain sight.
You have two non-negotiable checkpoints:
This technical check is your first line of defense. It stops the two most common mastering headaches—digital clipping and awkward loudness—before anyone else ever hears them. It’s a quick, easy way to guarantee a clean file.
Okay, the numbers look good. Now for the most important test: your ears. Technical perfection is meaningless if the track just doesn't feel right. This pass is all about subjective quality control, listening for anything that sounds out of place, weird, or just plain wrong.
While some of the best software for mastering audio can help automate parts of this, your ears are always the final judge.
As you listen, ask yourself these three crucial questions:
Let's get into some of the questions that pop up all the time when you're trying to nail down your mastering levels. Getting these right can feel a bit tricky, but once you clear up a few common points of confusion, you'll be able to finish your tracks with way more confidence.
This is a classic worry, but I've got good news: no, you really don't need to. That whole approach is pretty much a thing of the past.
These days, the smart move is to create one fantastic, versatile master that just works everywhere. Aim for an integrated loudness around -14 LUFS and keep your True Peak at -1.0 dBTP or lower. That's the sweet spot. A master like this is dynamic and clean, and it won’t get mangled by the different loudness normalization systems that all the streaming platforms use.
So, your track is quieter than the platform's target, like -14 LUFS. What happens? Simple: the service just turns it up to match the other songs. Honestly, this is a much better problem to have than being too loud.
The only potential hiccup is if your track is way too quiet. When the platform adds a lot of gain, it can also bring up the noise floor of your recording. It’s not a deal-breaker, but it's not ideal. By mastering close to the platform targets, you keep control and make sure your listeners get the most consistent, professional experience.
The Takeaway: It’s always safer to be a little on the quiet side than to be crushed and loud. But for the best result, hitting those target levels gives you the final say on how your music is presented.
Absolutely. For stuff like EDM or metal, that loudness is a huge part of the genre's character and energy. But there’s a big "but" you have to remember.
No matter how loud you push your master, Spotify and the others will turn it down to meet their target. The real art is finding that perfect balance.
Grab a commercial reference track in your genre and use it as your guide. Your goal is to make something that feels powerful and competitive, but without completely squashing the life out of it. If you over-compress, you’re just going to end up with a track that sounds smaller and less punchy after they turn it down anyway.
Ready to make sure your music hits just as hard in the car as it does in your studio? Over 40% of all music listening happens on the road, and that's where things can get messy. CarMaster is the only AI mastering service built from the ground up to fix car playback problems like phase cancellation and muddy bass. Get a free, instant preview and hear it for yourself. Master your song with CarMaster today.

.png)