
At its simplest, compression in music is just an automatic volume knob. It smartly turns down the loudest parts of a sound so you can turn up the quieter parts, giving you a much more consistent and polished track. This is the secret sauce behind pretty much every professional recording you've ever heard.

Imagine you hired a mixing assistant whose only job was to ride the volume fader. When the singer gets loud, they pull it down. When they whisper, they push it up. A compressor does that same job, but with lightning-fast, superhuman precision.
By squeezing the gap between the loudest and quietest moments—what we call the dynamic range—compression helps every instrument find its own space in a crowded mix. It’s the magic that lets a lead vocal go from a soft whisper to a full-on belt without one part getting totally lost or completely overwhelming everything else.
At its heart, compression is all about control. It’s not just about making things louder; it’s about shaping the energy of a sound to improve its clarity and feel.
Let's break down what it really brings to the table.
Audio compression wasn’t born in a music studio. It started in the early 20th century for radio broadcasting to keep volume levels in check and protect expensive transmission gear. By the 1960s, its use in pro studios hit nearly 90%, forever changing the sound of popular music. If you're a history buff, folks on Gearspace have some fascinating threads on this.
To really nail your mixes, you have to get a handle on what compression actually does. It's the key to creating tracks that feel energetic, sound polished, and translate well everywhere—from your studio monitors to your car stereo.
For a deeper dive, check out our full guide on what compression does in music. It’s a must-read for leveling up your production game.
Every single compressor, whether it's a vintage piece of hardware glowing in a rack or the slickest new plugin on your screen, is built around the same set of fundamental controls. This is its brain. Once you get a feel for these, you're well on your way to mastering compression in music.
Don't think of them as sterile, technical settings. Picture a little team of engineers inside that box, each with one specific job to do. Let's meet the crew.
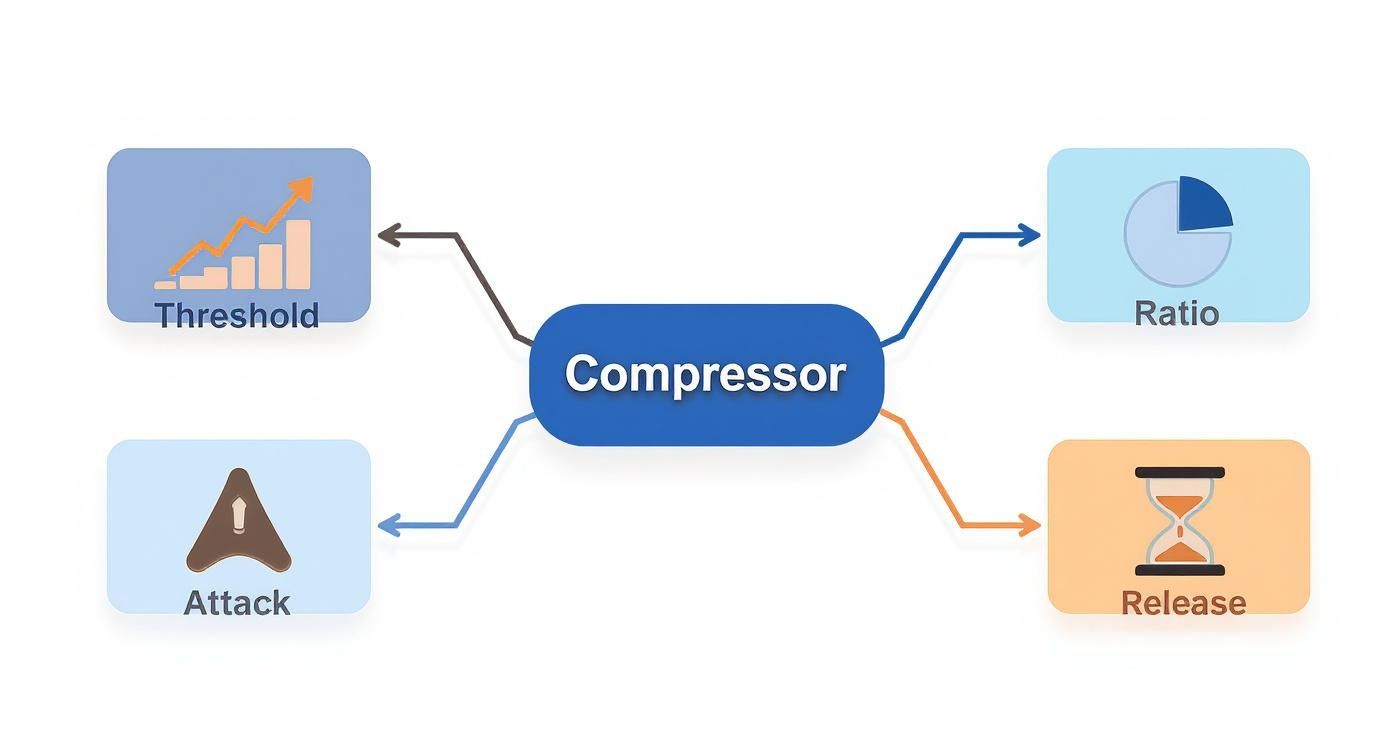
This image shows the five controls that are the absolute bedrock of compression. With these, you can shape the dynamics of any sound you throw at them.
The Threshold is your starting line. Think of it like a velvet rope at a club, set at a specific volume level measured in decibels (dB). Any part of your audio signal that's quieter than the threshold just waltzes right on by, completely untouched.
But the second a sound gets loud enough to step over that rope? The compressor bouncer wakes up and gets to work. If you set a lower threshold, you're telling the bouncer to be stricter, compressing more of the signal. A higher threshold means only the rowdiest, loudest peaks get any attention.
Once a signal crosses the threshold, the Ratio answers the next question: how much are we turning it down? You'll see this written as a comparison, like 2:1, 4:1, or 10:1.
A ratio of 4:1 means that for every 4 dB your audio tries to go over the threshold, the compressor will only let 1 dB out the other side. The bigger that first number, the heavier the squeeze.
This control is where so much of the character comes from. A gentle 2:1 ratio is perfect for subtly "gluing" elements of a mix together without anyone noticing. Crank it up to 10:1, and you're getting much more aggressive, ready to really clamp down on an unruly snare drum or a wild vocal performance.
Next up are Attack and Release, the timing controls. These two are all about how fast the compressor reacts and how long it holds on, which is absolutely critical for preserving—or intentionally changing—the feel of an instrument.
Attack: This knob decides how quickly the compressor starts turning down the volume once the signal pops over the threshold. A slow attack is your secret weapon for punch. It lets the initial "snap" of a drum or the pluck of a guitar string jump through before the compression kicks in. A fast attack is the opposite; it grabs the sound instantly, which is great for smoothing things out, like a spiky bass guitar or a dynamic vocal.
Release: This tells the compressor how quickly to let go and stop working once the audio drops back below the threshold. A fast release can add energy and excitement, but a slow release creates a smoother, more sustained sound. Be careful with slow releases, though—set them wrong, and you can get that distracting "pumping" sound as the volume breathes in and out.
And finally, since the whole point of compression is to turn down the loud parts, your track is now quieter overall. That's where Makeup Gain (sometimes called Output) comes in. You use this knob to turn the entire compressed signal back up, making the newly controlled loud parts powerful and the previously-too-quiet parts perfectly audible. This is how you increase the perceived loudness and bring your carefully shaped sound right to the front of the mix where it belongs.
Once you've got a handle on the basic controls, you'll quickly realize that not all compressors are built the same. Far from it. Each type has its own sonic personality, its own color, shaped by the circuitry inside. This is where you graduate from making technical tweaks to making creative decisions.
Think of it like having a set of paintbrushes. You wouldn't use a wide, soft brush to paint a sharp, aggressive line, right? Compressors are the same way. Each "family" of compressor imparts its own unique character on the sound. Knowing the difference is how you pick the right tool for the job.
This map breaks down the fundamental controls that every single compressor uses, no matter what type it is.
These core parameters—Threshold, Ratio, Attack, and Release—are the building blocks. They give you the raw power to shape your sound's dynamics, but the type of compressor you choose determines the flavor.
VCA (Voltage Controlled Amplifier) compressors are the transparent workhorses you'll find in almost every studio. They’re known for being precise and clean, making them incredibly versatile.
Because they don't really add much color or warmth, VCAs are perfect when you need tight, surgical control without messing with the instrument's original tone. They're fantastic for taming spiky transients on drums or clamping down on a choppy rhythm guitar.
FET (Field Effect Transistor) compressors are pretty much the polar opposite of clean. These things are all about attitude. Known for their lightning-fast attack times and harmonically rich character, FETs are designed to add energy and grit.
The undisputed king of FET compressors is the classic Urei 1176. Its aggressive, grabby sound has made it a studio legend for rock vocals, punchy drums, and in-your-face bass tones. It leaves a sonic fingerprint that is anything but subtle.
When you need something to jump out of the speakers and feel more exciting, a FET is often the answer.
Optical compressors, or "Optos," use a light-dependent resistor to handle gain reduction. The result? An incredibly smooth and musical response. Their attack and release actually react organically to the incoming signal, which is part of their magic.
This silky-smooth action makes them a go-to for:
The famous Teletronix LA-2A is the perfect example here. Engineers have cherished it for decades because of the warm, musical "glue" it adds to tracks.
Last but not least, Vari-Mu compressors use actual vacuum tubes for gain reduction. This gives them a rich, warm, and creamy character that's hard to replicate. They tend to be slower and gentler than other types, making them ideal for "gluing" elements together on a mix bus or during mastering.
This is the compressor you reach for when you want to add that final, expensive-sounding polish that makes the whole mix feel cohesive.
To make it easier to choose, here's a quick breakdown of the four main types and what they do best.
Ultimately, knowing the distinct personality of each compressor type gives you a massive advantage. It allows you to move beyond just controlling dynamics and start shaping the emotional impact of your music.

Knowing your compressor's knobs is one thing. But actually using them to sculpt a powerful, pro-level mix? That's where the real art comes in. It’s time to move past the theory and get some results with a few battle-tested techniques for the most critical parts of your track. Think of these as solid starting points, not rigid rules.
Dynamic range compression is basically universal in professional music today. In fact, surveys suggest that over 98% of commercially released songs use it somewhere in the mixing or mastering process. It has completely shaped the sound of modern music, as you can see in this brief history of professional audio compressors.
Vocals are the heart of most songs, but they’re also a dynamic nightmare. A singer can jump from a whisper to a full-on belt in a single line, which makes it incredibly tough to keep them sitting right in the mix. The goal is to iron out those volume swings so every word is clear and consistent.
Try starting with a medium-fast attack time to catch the loudest peaks without crushing the life out of the performance. A ratio of around 3:1 or 4:1 is often the sweet spot for taming those peaks gracefully.
If you want to go deeper, check out our guide on finding the perfect compression settings for vocals.
When you're compressing drums, you're not really trying to control them—you're trying to add character. You want that kick and snare to hit harder and feel more aggressive, not turn them into flat pancakes. The secret is a slower attack time. This lets the initial, sharp crack of the drum (the transient) punch through untouched right before the compressor clamps down.
This approach is all about making your drums feel energetic and powerful, driving the whole track forward.
A consistent bassline is the glue that holds a tight mix together. Your mission here is to lock it into place, making sure every note hits with the same weight and presence. Unlike drums, you usually want a faster attack to catch the front-end of the note and create a smooth, even sound. A 4:1 ratio is a fantastic starting point for a solid, reliable low end that connects the kick and the rest of the rhythm section.
Once you've got the basics down, you can start getting creative and adding some real depth to your mix.
Parallel Compression: This is the legendary "New York" compression trick. You blend a heavily squashed version of a track with the original, clean signal. This adds an incredible amount of weight and excitement without killing the natural dynamics of the performance. It's an absolute secret weapon for making drums and vocals sound huge.
Another killer technique is sidechain compression. This is where you use one track to trigger the compressor on another. You hear it all the time in electronic music—that rhythmic pumping where the bassline "ducks" out of the way every time the kick drum hits. It's an essential tool for carving out space and creating a modern, groovy feel in a busy arrangement.
When we get to the final mastering stage, the way we use compression completely changes. We're not doing surgery on individual instruments anymore. Think of it like polishing a finished sculpture instead of building it from scratch. The goal is much more subtle and holistic.
Mastering compression is all about creating cohesion. A gentle touch of compression across the entire mix acts like a transparent "glue," subtly pulling the kick, bass, vocals, and synths together. It’s what turns a collection of separate tracks into a unified, commercially competitive song where everything just fits.
This delicate process adds that final layer of punch and perceived loudness, all while keeping the track's dynamic lifeblood intact. It’s the final step before you send your music out into the world.
In mastering, less is almost always more. Go too hard, and you’ll suffocate the mix in a heartbeat. But a light touch can make it feel incredibly powerful and energetic. That's why mastering engineers get pretty specific with their settings.
Mastering is the art of subtle enhancement. You want the song to feel better without the listener ever realizing why. The right compression makes a track feel more cohesive and powerful, not just louder.
A well-built audio mastering chain relies on compression as one of its most critical final steps to achieve that professional polish.
Believe it or not, your mastering decisions directly affect how your music sounds on Spotify and Apple Music. These platforms use lossy audio formats to shrink file sizes for streaming, a practice that really took off with the MP3.
Developed back in 1991, the MP3 could compress files down to about 1/10th of their original size. By 2003, it was the king of digital music. You can get more of the backstory on the history of audio files from Bridge.audio.
The catch? This data compression can reveal flaws in your master. Tracks that are over-compressed can sound harsh or distorted after being converted to MP3 or AAC. By using gentle mastering compression, you create a dynamic, robust master that translates cleanly across every platform, ensuring your music sounds great everywhere.
As you start to really get your hands dirty with compression, a few questions always seem to pop up. Every producer hits these same hurdles, so let's clear the air on some of the most common points of confusion.
Think of this as the part of the conversation where we tackle those "what if" and "how do I" moments that can leave you scratching your head. Let's dive in.
This is probably the most common question I hear, and the answer is refreshingly simple: a limiter is just a compressor with an insanely high ratio. That's it.
Where a compressor might use a ratio of 4:1 to gently rein in a vocal, a limiter goes for the nuclear option with ratios like 20:1 or even ∞:1 (infinity-to-one).
At a ratio of ∞:1, the output signal is physically stopped from getting any louder than the threshold. A limiter is a brick wall. It's the bouncer at the door saying, "You shall not pass," which is why it's the go-to tool for preventing clipping on your master bus.
So, which one do you grab?
Ah, the million-dollar question. The frustrating but honest answer is, "it depends on what you're trying to do." Over-compressing is easily the most common mistake I see new mixers make. You squeeze a track so hard you suck all the life out of it, leaving a flat, boring signal with zero emotional impact.
You've probably heard this called the "sausage waveform" because, well, the audio file literally starts to look like a solid block. No peaks, no valleys, just... sausage.
To stay out of trouble, constantly A/B test your compressed track against the original. Make sure you match the loudness, so you're not just fooled by "louder is better." Ask yourself: Is this actually adding punch and consistency, or is it just squashing the performance? A solid rule of thumb is to shoot for just enough gain reduction to get the job done. For most individual tracks, 2-4 dB of gain reduction is often all you need.
Serial compression is a slick, more advanced trick where you chain two (or more) compressors back-to-back on the same signal. Instead of forcing one compressor to do all the heavy lifting, you split the job between two, each doing just a little bit of work. The result is almost always more transparent and natural.
Imagine you have a really dynamic vocal track. You could use the first compressor with a super-fast attack to just tame the absolute loudest, sharpest peaks—the parts that really jump out. Then, you follow it up with a second compressor with a slower attack and a gentler ratio to smooth out the overall performance.
By splitting the workload like this, you get incredible dynamic control without hearing either compressor gasping for air. It’s the best of both worlds: tight, modern control without sounding obviously processed.
Ready to make sure your final mix translates perfectly in every listening environment? CarMaster is an AI mastering service specifically designed to optimize your music for car audio systems, where bad masters often fall apart. Don't risk listeners skipping your track because of a poor mix. Get a free, instant preview and hear the difference.

.png)