
The difference between a factory stereo that sounds muddy and a high-fidelity system that makes your commute feel like a concert isn't always about expensive equipment; it's about the settings. Most drivers never touch the complex audio menus, leaving untapped potential on the table. This guide demystifies the process, providing a definitive list of the best audio settings for car stereo systems, regardless of your hardware.
We will move far beyond simple bass and treble knobs, diving into the professional techniques that create a truly immersive soundstage. You will learn to properly configure gain structure, calibrate time alignment for a perfect central image, and implement precise equalization that tames your car's unique acoustic challenges. These actionable steps are designed for immediate impact, helping you transform a flat or boomy audio experience into one defined by clarity, balance, and power.
Before you consider spending a dime on new speakers or amplifiers, learn how to maximize the gear you already own. Each of the following eight sections provides a step-by-step method to unlock a specific aspect of your system's performance. For artists and producers, understanding these principles is also key to ensuring your mixes translate well. This guide gives you the tools to finally hear your music the way it was meant to be heard, turning every drive into a listening session.
Before you touch any EQ or bass boost settings, the single most critical adjustment for achieving the best audio settings for your car stereo is establishing a proper gain structure. This foundational process involves matching the output voltage of your head unit (stereo) to the input sensitivity of your amplifier. It’s not about making your system louder; it's about making it as clean and clear as possible.
When gain is set correctly, you achieve the maximum signal-to-noise ratio, meaning you hear more music and less unwanted hiss or electrical noise. More importantly, it prevents "clipping," a form of a harsh, squared-off audio signal that not only sounds terrible but can physically damage your speakers and amplifiers.
Think of gain as a valve controlling the flow of the audio signal. If you open it too much at the amplifier, you're amplifying a distorted signal from the head unit, resulting in a noisy, compressed, and unpleasant sound. Industry leaders like JL Audio and Rockford Fosgate have long championed this principle, creating tools and educational resources to help installers and DIY enthusiasts get it right. Competitive car audio circuits like IASCA and MECA place heavy emphasis on a clean, distortion-free signal, which is impossible without a perfect gain structure.
The goal is to find the maximum volume on your head unit that produces a clean, undistorted signal and then adjust the amplifier's gain to match that level. This ensures you're sending the purest possible signal to be amplified.
Key Insight: The amplifier gain knob is an input sensitivity control, not a volume control. Its purpose is to match the amplifier to the head unit’s specific signal voltage for maximum fidelity, not to make the music louder.
The following infographic illustrates the basic workflow for setting your amplifier's gain to prevent clipping.
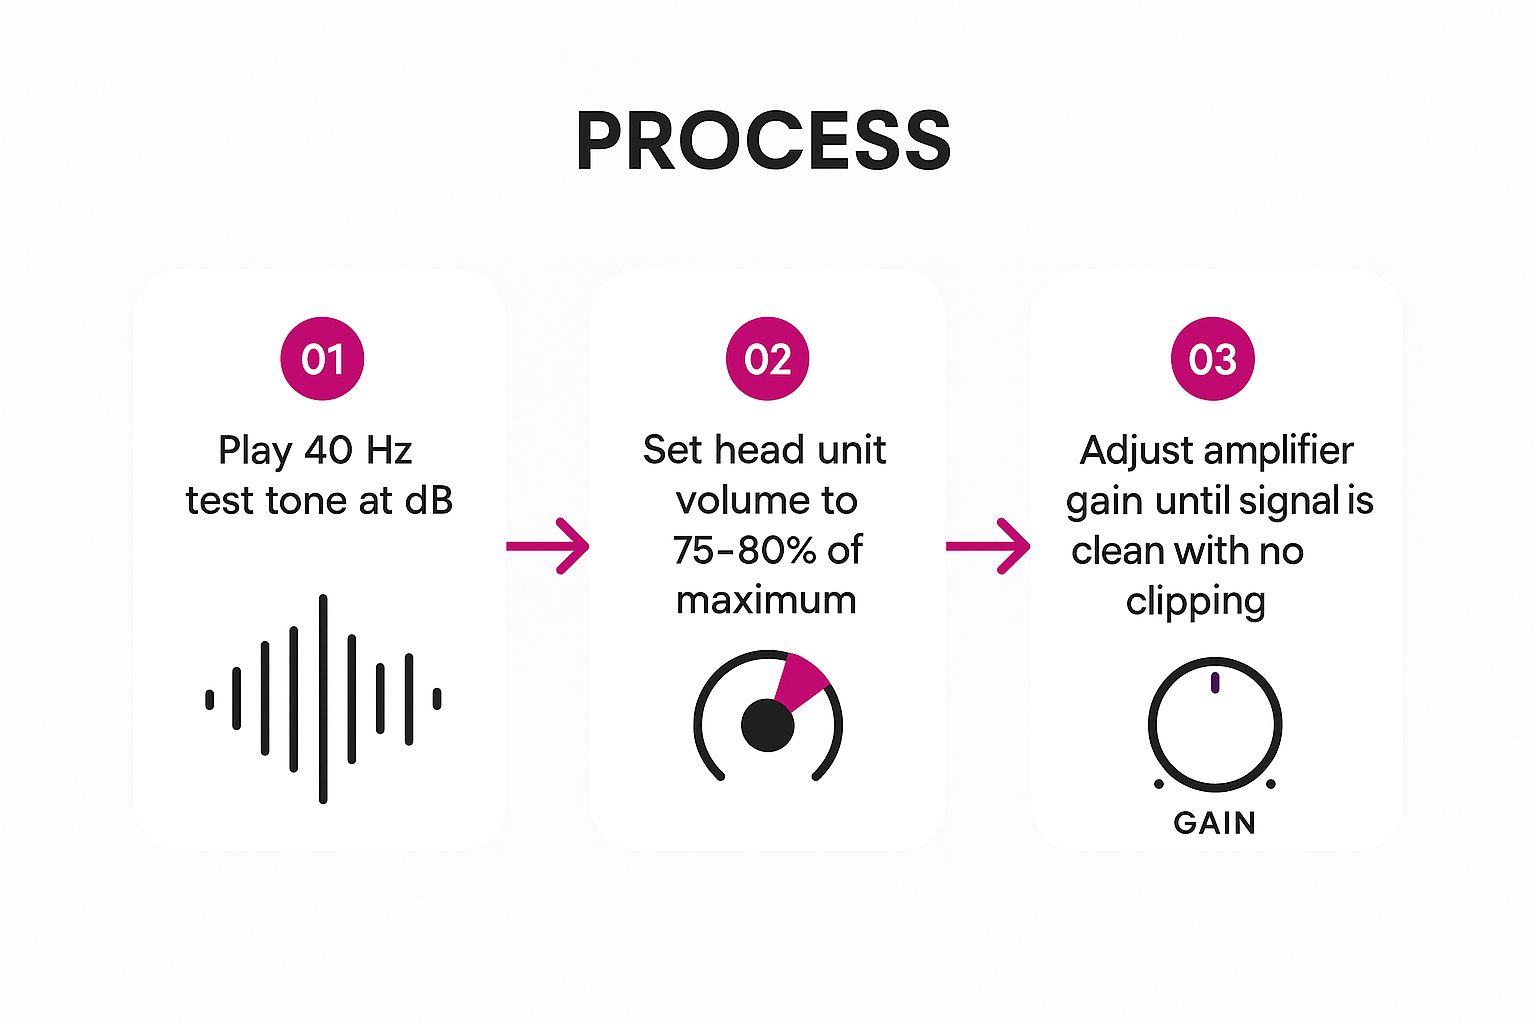
This process ensures you establish a clean signal baseline before any other audio adjustments are made, preventing the amplification of distortion.
After establishing a clean signal, the next crucial step for achieving the best audio settings for your car stereo is calibrating time alignment. A car's interior is an acoustically challenging, asymmetrical space where you are never equidistant from all speakers. Time alignment, also known as digital delay, corrects this by delaying the signal to the speakers closest to you, ensuring all sound waves arrive at your ears simultaneously. This creates a coherent, centered soundstage and transforms the listening experience from sound pulling to the nearest door into a properly imaged musical presentation.
When time alignment is set correctly, the audio image "snaps" into focus, creating a soundstage that appears on your dashboard, just like a live performance. It elevates your system from just being loud to being truly immersive and accurate, revealing depth and precise instrument placement in your music.
Time alignment is the secret to achieving a focused, high-fidelity stereo image in a car. Without it, the sound from the left-side speakers reaches your left ear far sooner than the sound from the right-side speakers, collapsing the stereo image and making it impossible to hear the music as the artist intended. Industry pioneers like Audison and Helix built their reputations on advanced Digital Signal Processors (DSPs) with precise time alignment capabilities. Even high-end factory systems from manufacturers like BMW and Mercedes-Benz now incorporate time alignment to deliver a premium, driver-focused audio experience.
The goal is to measure the distance from each speaker to your primary listening position (typically the driver's head) and apply a calculated delay to all speakers except the one farthest away. This synchronizes the arrival times of all audio signals.
Key Insight: Time alignment doesn't change the sound of a speaker; it changes when you hear it. This simple timing adjustment is the most powerful tool for creating a stable and realistic soundstage in an automotive environment.
To get started, follow these foundational steps:
After setting your gains, the next crucial step in dialing in the best audio settings for your car stereo is configuring your crossovers. Crossovers act as traffic directors for your audio signal, dividing the full frequency spectrum and sending specific ranges to the speakers designed to handle them. For example, high frequencies go to tweeters, mid-range frequencies to midrange drivers, and low frequencies to your subwoofer.
When crossovers are set correctly, each speaker operates within its optimal range, which prevents distortion and potential damage while dramatically improving overall clarity and imaging. Without them, you would send bass-heavy signals to tiny tweeters, causing them to distort and fail, or high-frequency signals to a subwoofer, resulting in muddy, undefined sound.
Proper crossover settings create a seamless sonic transition between all the speakers in your car. This ensures you hear a cohesive and balanced soundstage rather than individual speakers working against each other. Industry pioneers like JL Audio and Focal have built their reputations on educating users about the importance of precise crossover control, often including detailed recommendations with their component speaker sets. Even competitive sound quality organizations focus heavily on how well a system integrates its drivers, a feat impossible without accurate crossover tuning.
The goal is to filter out frequencies that a speaker cannot reproduce cleanly. This is done using High-Pass Filters (HPF), which block frequencies below a set point, and Low-Pass Filters (LPF), which block frequencies above a set point. Most modern head units and amplifiers from brands like Alpine, Kenwood, and Sony offer adjustable crossover points.
Key Insight: Crossovers protect your speakers and clarify your sound. Setting a high-pass filter on your door speakers at 80 Hz, for instance, stops them from trying to reproduce deep bass, allowing them to play louder and cleaner.
A typical starting point for a system with a subwoofer is to set the LPF for the subwoofer at 80 Hz and the HPF for the front and rear speakers at 80 Hz. From there, you can adjust slightly to find the smoothest blend. The crossover "slope" (measured in dB per octave, like 12dB or 24dB) determines how sharply the frequencies are cut off. A steeper slope, like 24dB, creates a more aggressive cutoff, which is ideal for subwoofers to prevent them from being easily localized.
After setting your levels and crossovers, the next crucial step in dialing in the best audio settings for your car stereo is equalization (EQ). EQ allows you to finely adjust specific frequency ranges to counteract the challenging acoustic environment of a vehicle interior. Unlike a listening room at home, a car is filled with reflective glass, absorbent seats, and resonant plastic panels, all of which create unwanted frequency peaks and nulls that color the sound.
Proper equalization tames these acoustic problems, resulting in a more balanced, clear, and enjoyable listening experience. It transforms a harsh or muddy sound into a smooth, detailed, and accurate musical presentation, allowing you to hear your music as the artist intended.
A car's interior is an acoustic nightmare. For instance, reflective surfaces like the dashboard and windshield often create harshness in the 2-3 kHz range, while door panels can resonate and cause muddiness around 250-315 Hz. Without EQ, these issues are unavoidable. Companies like AudioControl have pioneered measurement-based equalization with their powerful DSP processors, while JL Audio's TüN software has made sophisticated EQ tuning accessible to enthusiasts. Tuning experts like Gordon Moore have long educated the car audio community on using EQ not just to "color" the sound, but to surgically correct acoustic flaws.
The primary goal of EQ is to create a tonally balanced sound signature by cutting problematic frequencies rather than excessively boosting others. This subtractive approach preserves your amplifier's headroom and prevents the introduction of new distortion.
Key Insight: Use your equalizer as a corrective tool, not a creative one. Start by cutting frequencies that sound harsh, boomy, or muddy. Small, precise cuts are far more effective than large, wide boosts for achieving a clean and natural sound.
Here are some common starting points for addressing typical in-car acoustic issues:
By making small, methodical adjustments and A/B testing your changes, you can systematically solve your car's acoustic problems. For those seeking a deeper understanding, the principles of EQ in a car share similarities with studio work; for more on this, you can explore the concepts behind a professional audio mastering chain.
Once your gain is clean and your crossovers are set, you can focus on refining the low-frequency impact of your system. Bass boost and subsonic filters are two powerful tools, often found on monoblock or subwoofer amplifiers, that work together to shape your bass. Bass boost selectively increases the volume of a narrow band of low frequencies for more punch, while a subsonic filter removes inaudible, ultra-low frequencies that can damage your subwoofer and waste amplifier power.
Properly configuring these settings allows you to achieve powerful, tight, and controlled bass. The subsonic filter acts as a safety net, protecting your woofer from over-excursion caused by frequencies below its effective range. Bass boost then adds musical emphasis to the frequencies you actually want to hear and feel.
Achieving deep, impactful bass without distortion or damage is a core goal of any quality car audio setup. A subsonic filter is essential for this, especially with ported enclosures, as it prevents the subwoofer from unloading below the box's tuning frequency. High-power brands like Sundown Audio and Digital Designs stress the importance of precise subsonic filtering to protect their high-excursion subwoofers. Simultaneously, manufacturers like Rockford Fosgate and Kicker popularized adjustable bass boost to give users the ability to tailor that "punch" to their specific taste and musical library, making it a key part of the modern bass experience.
The goal is to protect your subwoofer while enhancing the audible bass frequencies. The subsonic filter is set based on your enclosure type, while bass boost is adjusted according to your musical preference.
Key Insight: The subsonic filter is a protective tool, not a tone control. It removes power-wasting, inaudible frequencies to improve sound quality and protect your equipment, allowing the bass boost to work more effectively and safely.
Here’s a basic approach to configuring these settings:
This balanced approach ensures your subwoofer operates efficiently and safely, delivering clean, powerful bass tailored to your listening style.
After fine-tuning your hardware settings, the quality of your audio source material becomes the ultimate bottleneck for your system's performance. Optimizing your source files and playback methods is a critical step in achieving the best audio settings for your car stereo, as no amount of equalization can restore detail that was never there in the first place. This means prioritizing lossless formats, high-quality streaming, and superior connection methods.
A high-end audio system can only reproduce the information it is given. Feeding it a low-quality, compressed MP3 file is like asking a professional artist to paint a masterpiece using only a few dull crayons. The full potential of your speakers and amplifiers remains untapped because the foundational audio data is incomplete.
The principle of "garbage in, garbage out" is paramount in audio. Lossless formats like FLAC, WAV, and ALAC contain 100% of the original recording data, while lossy formats like MP3 and standard AAC discard information to reduce file size, resulting in a less detailed and dynamic sound. Industry innovators like Tidal and Apple Music have brought high-fidelity streaming to the mainstream, while brands like Sony and Pioneer champion high-resolution audio support in their head units, recognizing that the source is the true starting point of the signal chain. A pristine source file ensures your finely tuned system has a rich, complete signal to work with.
The goal is to ensure the digital audio signal entering your head unit is as close to the original studio recording as possible. This involves selecting the right file types, streaming services, and connection methods to minimize data loss before the signal even reaches your stereo's processor.
Key Insight: Your car stereo can only sound as good as the weakest link in your audio chain. Often, that weak link is a low-bitrate Bluetooth stream or a poorly encoded MP3 file, not the equipment itself.
Once your levels are set and your crossovers are in place, refining the integration between your subwoofer and your main speakers is the next critical step. This is achieved through phase control, a setting that aligns the timing of the sound waves produced by your subwoofer with those from your front speakers. When phase is misaligned, sound waves can cancel each other out, resulting in weak, "thin," or disconnected bass, even with a powerful subwoofer.
Proper phase alignment ensures that the low-frequency sound waves from your subwoofer arrive at your ears in sync with the mid-bass waves from your door speakers. This creates a seamless, cohesive soundstage where the bass feels like it's coming from the front of the car, musically integrated with the rest of the sound, rather than sounding like a detached boom from the trunk.
Think of phase as two people pushing a swing. If they push at the same time (in phase), the swing goes high. If one pushes while the other pulls (out of phase), the swing goes nowhere. In your car, this cancellation occurs at specific frequencies, creating a "suck-out" or dead spot in the bass response. Industry pioneers like JL Audio and AudioControl have long emphasized phase as a key tuning parameter, incorporating phase controls into their amplifiers and digital signal processors (DSPs). In competitive audio, precise phase alignment is non-negotiable for achieving a top-tier, accurate soundstage.
The goal is to find the phase setting where the bass sounds loudest, fullest, and most connected to the front speakers from the driver's seat. This is typically done by ear, listening for the point of maximum bass impact.
Key Insight: The phase switch or knob isn't about changing the character of the bass; it's about correcting its timing relative to your other speakers. The correct setting synchronizes the speakers for a unified and powerful acoustic output.
Here are the practical steps to correctly set your subwoofer's phase:
Loudness compensation is a crucial, often misunderstood feature designed to correct a natural quirk of human hearing. Our ears are less sensitive to low and high frequencies at lower volumes, a psychoacoustic principle detailed by the Fletcher-Munson curves. This means that at low listening levels, music can sound thin and lacking in richness. Loudness controls automatically boost bass and treble to compensate, creating a fuller sound.
As you increase the volume, this boost is gradually reduced, ensuring a consistent and balanced tonal character across all listening levels. This dynamic adjustment is one of the smartest ways to achieve the best audio settings for your car stereo, whether you're on a quiet late-night drive or dealing with road noise during a commute.
Properly implemented loudness compensation preserves the intended musical balance of a recording regardless of the playback volume. Without it, you might constantly fiddle with your bass and treble knobs, trying to find a setting that works at both low and high volumes, which is an impossible task. This volume-dependent EQ ensures the music sounds full and impactful without manual intervention.
Pioneers like Alpine, with their advanced MediaXpander technology, and Kenwood, with adjustable loudness curves in their Excelon units, have perfected this feature. It’s the audio equivalent of your eyes adjusting to a dark room, providing the necessary enhancement when needed and backing off when it’s not. This intelligent processing ensures a more natural and enjoyable listening experience.
The goal is to enable loudness to a degree that makes low-volume listening satisfying without sounding overly processed or boomy as the volume increases. This feature is meant to be a subtle enhancement, not an aggressive EQ shift.
Key Insight: Loudness is not a simple bass boost. It's a dynamic equalizer that adapts to your listening level, making it a "set and forget" feature for maintaining tonal balance, unlike static EQ settings that can sound wrong at different volumes.
Follow these tips to dial in your loudness setting perfectly:
Properly using this feature can significantly improve your daily listening enjoyment, making your system sound great at any volume. For more on how audio levels are managed, explore how dynamic range compression is used in music production.
Navigating the world of car audio can seem complex, but as we've explored, achieving a truly exceptional listening experience is not about a single magic setting. Instead, it's a methodical process of layering precise adjustments. By mastering each component, from the foundational gain structure to the intricate details of time alignment, you transform your vehicle from a simple mode of transport into a personal concert hall. The best audio settings for your car stereo are a symphony of small, intentional choices that work together in harmony.
Think of it as building a house. Your gain settings are the solid foundation, ensuring there's no distortion or weakness. Crossovers act as the walls, directing different frequencies to the speakers designed to handle them. Time alignment is the interior design, arranging the sound so it arrives at your ears from a perfectly staged, cohesive soundscape. Finally, equalization is the paint and decor, adding the final tonal character that makes the space uniquely yours. Each step is crucial and builds upon the last.
The most significant takeaway is that these settings are interconnected. A poorly set crossover will undermine even the most meticulous EQ curve. Likewise, a pristine source file can be ruined by improper gain staging. The journey to sonic perfection involves revisiting and fine-tuning these elements as you go.
Here are the core principles to remember:
Ultimately, the quality of your sound is limited by the quality of your source material. No amount of tuning can fix a poorly mixed or low-resolution audio file. This is especially true for independent artists and producers who pour their hearts into their music. The challenging acoustics of a car cabin, with its reflective surfaces and ambient noise, can be unforgiving to a standard master. It can make a powerful track sound muddy, thin, or harsh. This is where the final piece of the puzzle comes into play, ensuring your art translates perfectly from the studio to the street. The best audio settings for a car stereo are most effective when the music itself is optimized for that specific environment.
Ready to ensure your music sounds as powerful and clear in the car as it does in your headphones? Stop letting standard masters compromise your sound. Visit CarMaster today and get your tracks professionally optimized for automotive playback, guaranteeing your music hits with maximum impact on any car stereo system. Unlock the true potential of your sound at CarMaster.

.png)