
Hearing that crackle, fuzz, or clipped sound is a dead giveaway: your audio is distorted. It’s what happens when a signal gets pushed past what your system can handle, which literally alters the original sound wave.
Think of it like an overexposed photo. All the fine details get blown out and replaced with harsh, ugly artifacts.
When your sound is distorted, it's not just some vague "bad sound." It's a specific technical problem—the shape of the audio waveform is being physically changed. While there are a few ways this can happen, it almost always boils down to one simple thing: something in your signal chain is getting pushed way too hard.
This has been a headache for engineers since the dawn of audio. Even today, with the global loudspeaker market valued at a massive USD 6.1 billion, the best gear in the world will distort if you push it beyond its limits. Mechanical or electronic parts just can't keep up, creating nasty sounds that were never in the original recording. You can get a sense of the industry's scale from this Future Market Insights report.
To help you troubleshoot, I've put together a quick cheat sheet. Not all distortion sounds the same, and knowing what you're hearing is half the battle.
Learning to spot these different flavors of distortion will make you much faster at diagnosing and fixing problems in your mix.
Key Takeaway: The first step to fixing distortion is recognizing it. Whether it's the hard crackle of digital clipping or the fuzzy warmth of overloaded analog gear, each type tells a story about where your signal went wrong.
Getting these fundamentals down is a game-changer. A related concept, audio compression, also deals with managing signal levels, but it’s done for creative control. To see how it's different from just straight-up clipping, check out our guide on what compression does in music.
Alright, so your track sounds distorted. Before you start tweaking compressors on your master bus, you need to play detective. The fix is often way simpler than you think, but you have to find the source first. Messing with the final mix won't do a thing if the problem is a single synth track that's been pushed way too hard.
The first, and easiest, thing to do is to grab that solo button in your DAW. Seriously. Just go down your tracklist one by one. This simple step will quickly tell you which instrument or vocal is the culprit. More often than not, it's something obvious—a kick drum hogging all the headroom or a vocal that was recorded way too hot.
If you're just starting out, getting your levels right from the beginning can save you a world of hurt. We've got a whole guide on how to record vocals at home that dives deep into setting proper levels from the get-go.
Once you've zeroed in on the problematic track, it's time to inspect its signal chain. A plugin is a very common cause of distortion. A compressor, saturator, or even an EQ can be the offender if its input or output gain is cranked. Start bypassing each plugin on that channel, one by one. If the distortion vanishes, you've found your culprit.
This chart can also give you a head start by helping you identify what kind of distortion you're hearing, which can point you toward the cause.
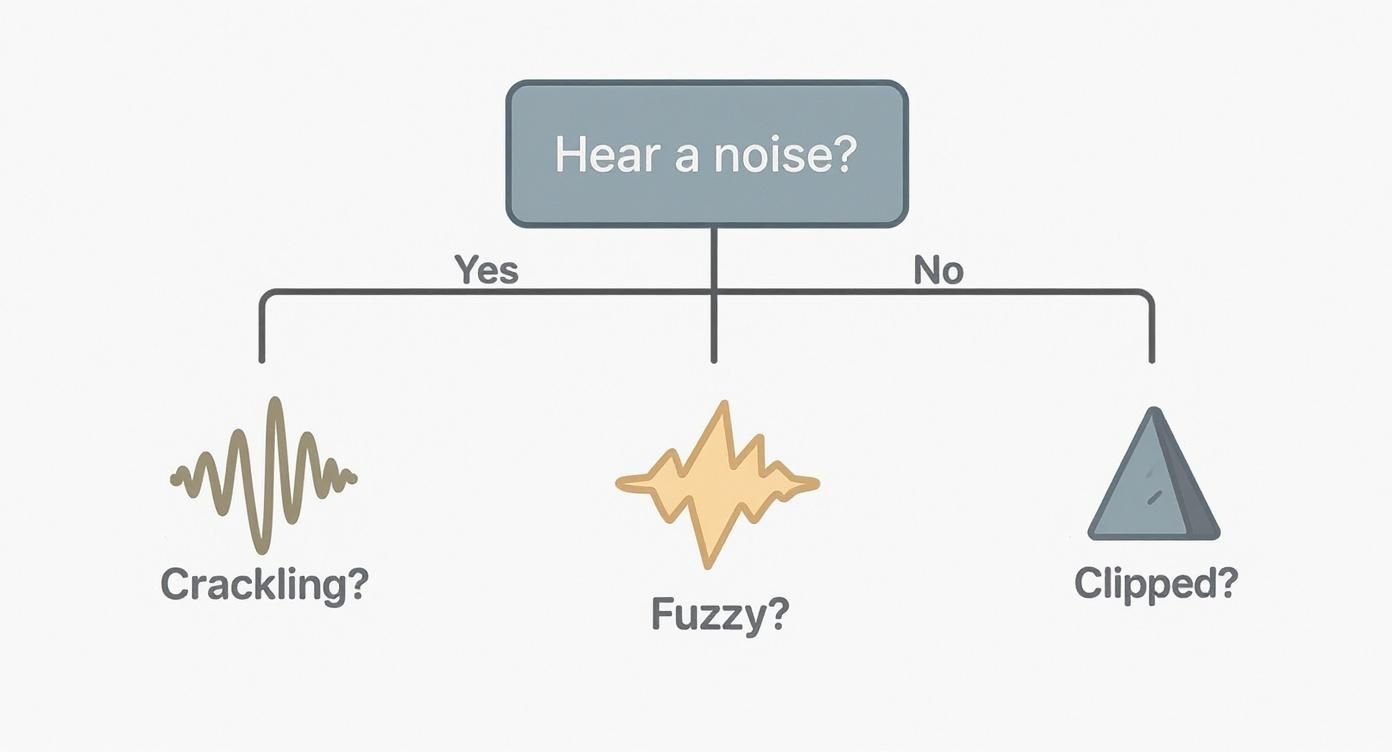
Think of it like a decision tree. If you're hearing a "crackling" sound, it's likely a different issue than a "fuzzy" one, and this visual helps narrow it down fast.
Throughout this process, keep your eyes glued to your meters—both on individual tracks and the master bus. Any channel that’s constantly blinking red is a huge red flag. This isn't just a music production issue, either. Poor audio quality is often the reason people run into problems with speech-to-text tools. In fact, you can find a great resource for troubleshooting voice typing issues that often traces back to input signal problems like clipping.
Pro Tip: Your meters are your best friends. A track doesn't need to be slammed into the red constantly to cause distortion. Even quick, occasional peaks can introduce that nasty digital clipping that makes an entire mix feel harsh and brittle. Always aim for healthy levels with plenty of headroom.
Alright, let's get into the practical stuff. When your sound is hitting the red and getting crunchy, you need a clear game plan. These techniques are your first line of defense right inside your Digital Audio Workstation (DAW), and they’re the bedrock of any clean, professional-sounding mix.
The single most important concept to get right is gain staging. This is just a fancy term for managing your audio's volume level at every single point in the signal chain—from the raw track, through every plugin, and into your busses. The classic rookie mistake? Pushing everything way too loud, way too early.
A solid rule of thumb I’ve always followed is to keep the peaks of individual tracks hovering around -6dBFS (decibels full scale). This isn't just some random number. It gives you a ton of headroom to play with later, which is crucial for preventing your master bus from clipping when everything starts adding up.
Even if your gain staging is on point, a really dynamic performance—like a powerful vocal take or a punchy snare hit—can still have sudden, loud peaks that introduce distortion. This is the perfect job for a limiter. Think of it as an unbreakable brick wall for your audio signal.
A limiter is basically your insurance policy against clipping. By dropping one on your master bus and setting the ceiling just below 0dBFS (I usually go with -0.3dBFS), you create a safety net. It’s a guarantee that no signal will ever spill over into the red, which completely eliminates digital clipping from your final output.
Pro Tip: While a limiter is a fantastic safety net, don't lean on it to fix a mix that's just fundamentally too loud. If you see that limiter working overtime and constantly smashing your audio, that’s your cue to go back and pull down the individual track faders. Real clarity comes from a balanced mix, not from ramming everything into a brick wall.
Here’s something that trips a lot of people up: sometimes that "distorted" sound has nothing to do with clipping. It can actually be a build-up of harsh or clashing frequencies. You know the sound—a muddy low-end that rumbles uncontrollably or a piercing high-end that makes you wince. This sonic pile-up can easily be perceived by listeners as distortion.
This is where you bring in the scalpel: a surgical EQ. Forget about broad, sweeping changes. We're talking about using a narrow Q setting to hunt down and dial back very specific problem frequencies.
This isn't just studio magic; these skills apply everywhere. For example, the art of creating perfect audio with a wedding sound system leans heavily on the same principles—careful EQ to prevent feedback and strategic limiting to make sure toasts are clear and music is powerful but not distorted. Mastering this discipline is what separates the pros from the amateurs in any high-stakes listening environment.
You’ve done everything by the book. You’ve meticulously gain-staged every track, hunted down rogue frequencies with surgical EQ, and even slapped a safety limiter on your master bus. But still… something’s just not right.
When your sound is distorted in subtle ways you can't quite put your finger on, it's a classic sign you've hit the ceiling of what you can fix in the mix.
This is the perfect moment to call in a professional mastering engineer or use a high-quality service. Their job isn’t to fix a train wreck of a mix, but to give it that final polish that takes a track from good to undeniable. They’re working in acoustically treated rooms with monitoring systems that cost more than my car, allowing them to hear tiny imbalances you’d never catch in a typical home studio.
After pouring countless hours into a project, you get "ear fatigue." It happens to all of us. You lose perspective. A mastering engineer brings a fresh, objective set of ears to the table. They can instantly spot subtle harmonic distortion or stereo imaging issues that are clouding up the track's clarity.
Think of a mastering engineer as your quality control expert. They’re looking for problems that go way beyond simple clipping.
Let's be real, the demand for crystal-clear, distortion-free audio is only getting bigger. The global luxury audio market is on track to hit $3.9 billion by 2029, and that growth is fueled by listeners who expect incredible clarity. Mastering is how you meet that standard. You can read more about this trend in the luxury audio market if you're curious.
Key Insight: Mastering isn’t just about making your song louder. It's about making it better. A great mastering job adds depth, clarifies the stereo image, and ensures your artistic vision comes through perfectly, no matter how someone is listening.
Ultimately, mastering is the final sanity check for your music. It ensures no weird artifacts or lingering issues made it through the final mix. While plenty of producers do both, understanding the difference between mixing and mastering is key to knowing when it's time to pass the torch. It’s the last step in making sure all your hard work shines through, clean and powerful.

Let's be real: the bar for audio quality has shot through the roof. Listeners today aren't just using cheap earbuds anymore. They're plugged into high-res streaming services with audiophile-grade headphones, and they can hear everything—including that tiny bit of distortion you hoped nobody would notice.
This isn't just about sounding good, either. It's a straight-up technical requirement for a lot of modern media. Think about immersive formats like VR and gaming. If the audio is distorted, it doesn't just sound bad; it completely shatters the illusion. The spatial cues get all messed up, and the whole experience just falls apart.
The 3D audio market is a perfect example of this shift. It hit an estimated $5.94 billion in 2024 because people are craving that clear, immersive experience. In that world, distortion is the ultimate enemy. If you want to dive deeper, you can explore more data on this audio market growth and see what it means for creators.
Why It Matters: Getting a handle on distortion isn't just a box to check during mastering. It's a crucial skill for making your music connect with a modern audience, ensuring it sounds professional and powerful, no matter where it's played.
At the end of the day, you have to understand what your listeners expect. Your mix doesn't just exist in your studio—it has to perform flawlessly out in the wild.
We field a ton of questions from producers trying to figure out why their tracks sound distorted and what the heck to do about it. Let's clear up a few of the most common ones that land in our inbox.
Not at all! In fact, when you use it on purpose, it's one of music's greatest creative tools. We call it saturation, and it's the secret sauce for adding warmth, bite, and rich harmonics to everything from guitars and bass to drums and vocals. Think of the growl on a rock guitar or the subtle warmth on a vintage synth.
The whole game is about control. Unwanted distortion is that ugly, crackling sound of a signal pushed too far by accident—it's a mix-killer. Creative saturation, on the other hand, is a deliberate choice, an artistic flourish that makes a track feel alive.
Ah, the classic mystery. This one trips up producers all the time, and the culprit is almost always hiding somewhere before the master channel. Your final output meter might look perfectly clean, but one overloaded track or plugin can be poisoning the well.
Time to do some detective work. Start soloing your individual tracks. Is one of them hitting the red? Check the plugins on each channel, too. It's surprisingly easy to slam a compressor, EQ, or amp simulator too hard, creating nasty distortion that gets baked into the sound long before it ever reaches the master fader.
The Takeaway: A clean master fader can be deceptive. Distortion can (and often does) happen on individual tracks or plugins. You have to hunt it down channel by channel.
If it's done right, absolutely not. A huge part of what a good mastering engineer does is push the loudness up to commercial levels without introducing that crunchy, distorted sound. It's a fine art.
They use incredibly sophisticated tools—high-end limiters, clippers, and dynamic processors—to carefully shave off peaks and manage the dynamics. The goal is to get your track loud and punchy while keeping it clean, clear, and free of any unwanted digital grit.
Ready to skip the guesswork and get a clean, punchy master that sounds incredible in the car? CarMaster is built for this. We use specialized processing to deliver professional, distortion-free results in just a few minutes. Give it a try for free.

.png)